# Packative CAD Help — full documentation
> Packative CAD is a parametric packaging-CAD system: a library of FEFCO, ECMA and Packative dielines, 3D folding, sheet and kit nesting, DXF import and manufacturing exports, in the browser.
---
Packative CAD · Help
# Make a Box Dieline in Minutes
Select a box style, type its size and select the board. Packative CAD
draws the dieline for you: the flat drawing of your box, with lines for cutting and
folding. You can see it in 3D and download it for print.
[Make Your First Box](https://cad.packative.one/help/get-started/quick-tour/){ .md-button .md-button--primary }
[What Packative CAD Does](https://cad.packative.one/help/get-started/){ .md-button }
## What Do You Want to Do?
### [Find a Box Style](https://cad.packative.one/help/guide/library/)
Search the library by name, code or shape.
### [Quick Box Setup](https://cad.packative.one/help/guide/easy-configuration/)
Select a box, its size and closures from pictures.
### [Set Your Box Size](https://cad.packative.one/help/guide/configurator/)
Type the length, width and height. The dieline follows.
### [See Your Box in 3D](https://cad.packative.one/help/guide/3d/)
Fold the box on screen and show it to a customer.
### [Download Files for Print](https://cad.packative.one/help/guide/export/)
Get a PDF, DXF or Illustrator file for your die maker or printer.
### [Fit Boxes on a Sheet](https://cad.packative.one/help/guide/sheet-layout/)
See how many boxes fit on each sheet size.
### [Manage Your Sheet Sizes](https://cad.packative.one/help/guide/sheet-sizes/)
Keep the press sheets you print on, ready to pick.
### [Use Your Own Dieline File](https://cad.packative.one/help/guide/dxf-import/)
Open a DXF file you already have.
## A Few Box Styles
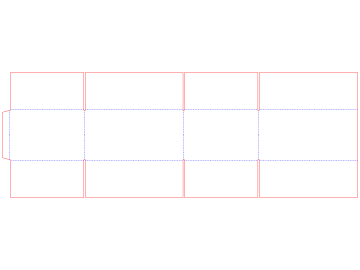
Shipping box (FEFCO 0201)
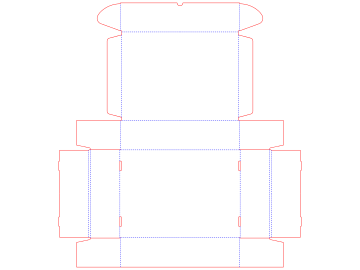
Mailer box (FEFCO 0427)
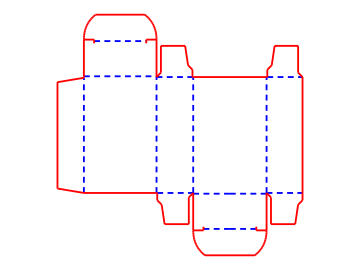
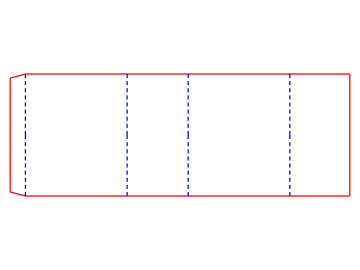
Tuck-end carton (ECMA A20.20.03.01)
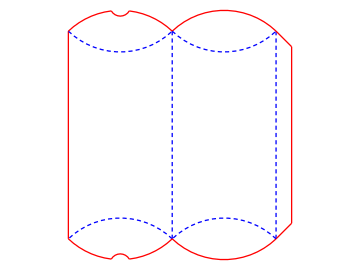
Pillow box (ECMA F70.00)
Find more in [Find a Box Style](https://cad.packative.one/help/guide/library/).
---
# What Packative CAD Does
Packative CAD makes box dielines in your browser. A dieline is the flat drawing of your
box, with lines for cutting and folding. You select a box style, type its size and select
the board. The app draws the dieline at true size, ready for your die maker or printer.

A shipping box (FEFCO 0201). Red lines are cut. Blue lines are folded.
## Who It Is For
- **Designers** get a dieline at the customer's size, ready for artwork.
- **Sales people** show the customer the box in 3D before anything is made.
- **Printers and box makers** see how many boxes fit on each sheet before they quote.
You do not need any CAD or packaging engineering knowledge.
## What You Can Do
| You want to | Read |
|---|---|
| Find a box style by name, code or shape | [Find a Box Style](https://cad.packative.one/help/guide/library/) |
| Set the length, width and height | [Set Your Box Size](https://cad.packative.one/help/guide/configurator/) |
| Choose the board or paper | [Choose the Board or Paper](https://cad.packative.one/help/guide/materials/) |
| See the box folded in 3D | [See Your Box in 3D](https://cad.packative.one/help/guide/3d/) |
| Download a PDF, DXF or Illustrator file | [Download Files for Print](https://cad.packative.one/help/guide/export/) |
| Set up a box by selecting pictures | [Quick Box Setup](https://cad.packative.one/help/guide/easy-configuration/) |
| Count how many boxes fit on a sheet | [Fit Boxes on a Sheet](https://cad.packative.one/help/guide/sheet-layout/) |
| Keep your own list of press sheets | [Manage Your Sheet Sizes](https://cad.packative.one/help/guide/sheet-sizes/) |
New here? [Make Your First Box](https://cad.packative.one/help/get-started/quick-tour/) walks you through it in about ten minutes.
## Share a Box With a Link
The app does not save your boxes. Instead, the box style and its sizes live in the page
address. To share or keep a box, copy the address from your browser and send it or
bookmark it. Anyone who opens it sees the same box.
## Open the App
1. Open `https://cad.packative.one`.
2. Select **Continue with Google**. Your account is made the first time you sign in.
The app is free while it is in beta. You get a monthly allowance of credits. Browsing the
library is free. Drawing, 3D, layouts and downloads use credits. See
[Sign In and Credits](https://cad.packative.one/help/guide/account/).
## Next Steps
[Make Your First Box](https://cad.packative.one/help/get-started/quick-tour/){ .md-button .md-button--primary }
[How To](https://cad.packative.one/help/guide/){ .md-button }
---
# Make Your First Box
In about ten minutes you make a shipping box at your own size and download its dieline
as a PDF. The dieline is the flat drawing of your box, with lines for cutting and
folding. This example uses FEFCO 0201, the most common corrugated shipping box.
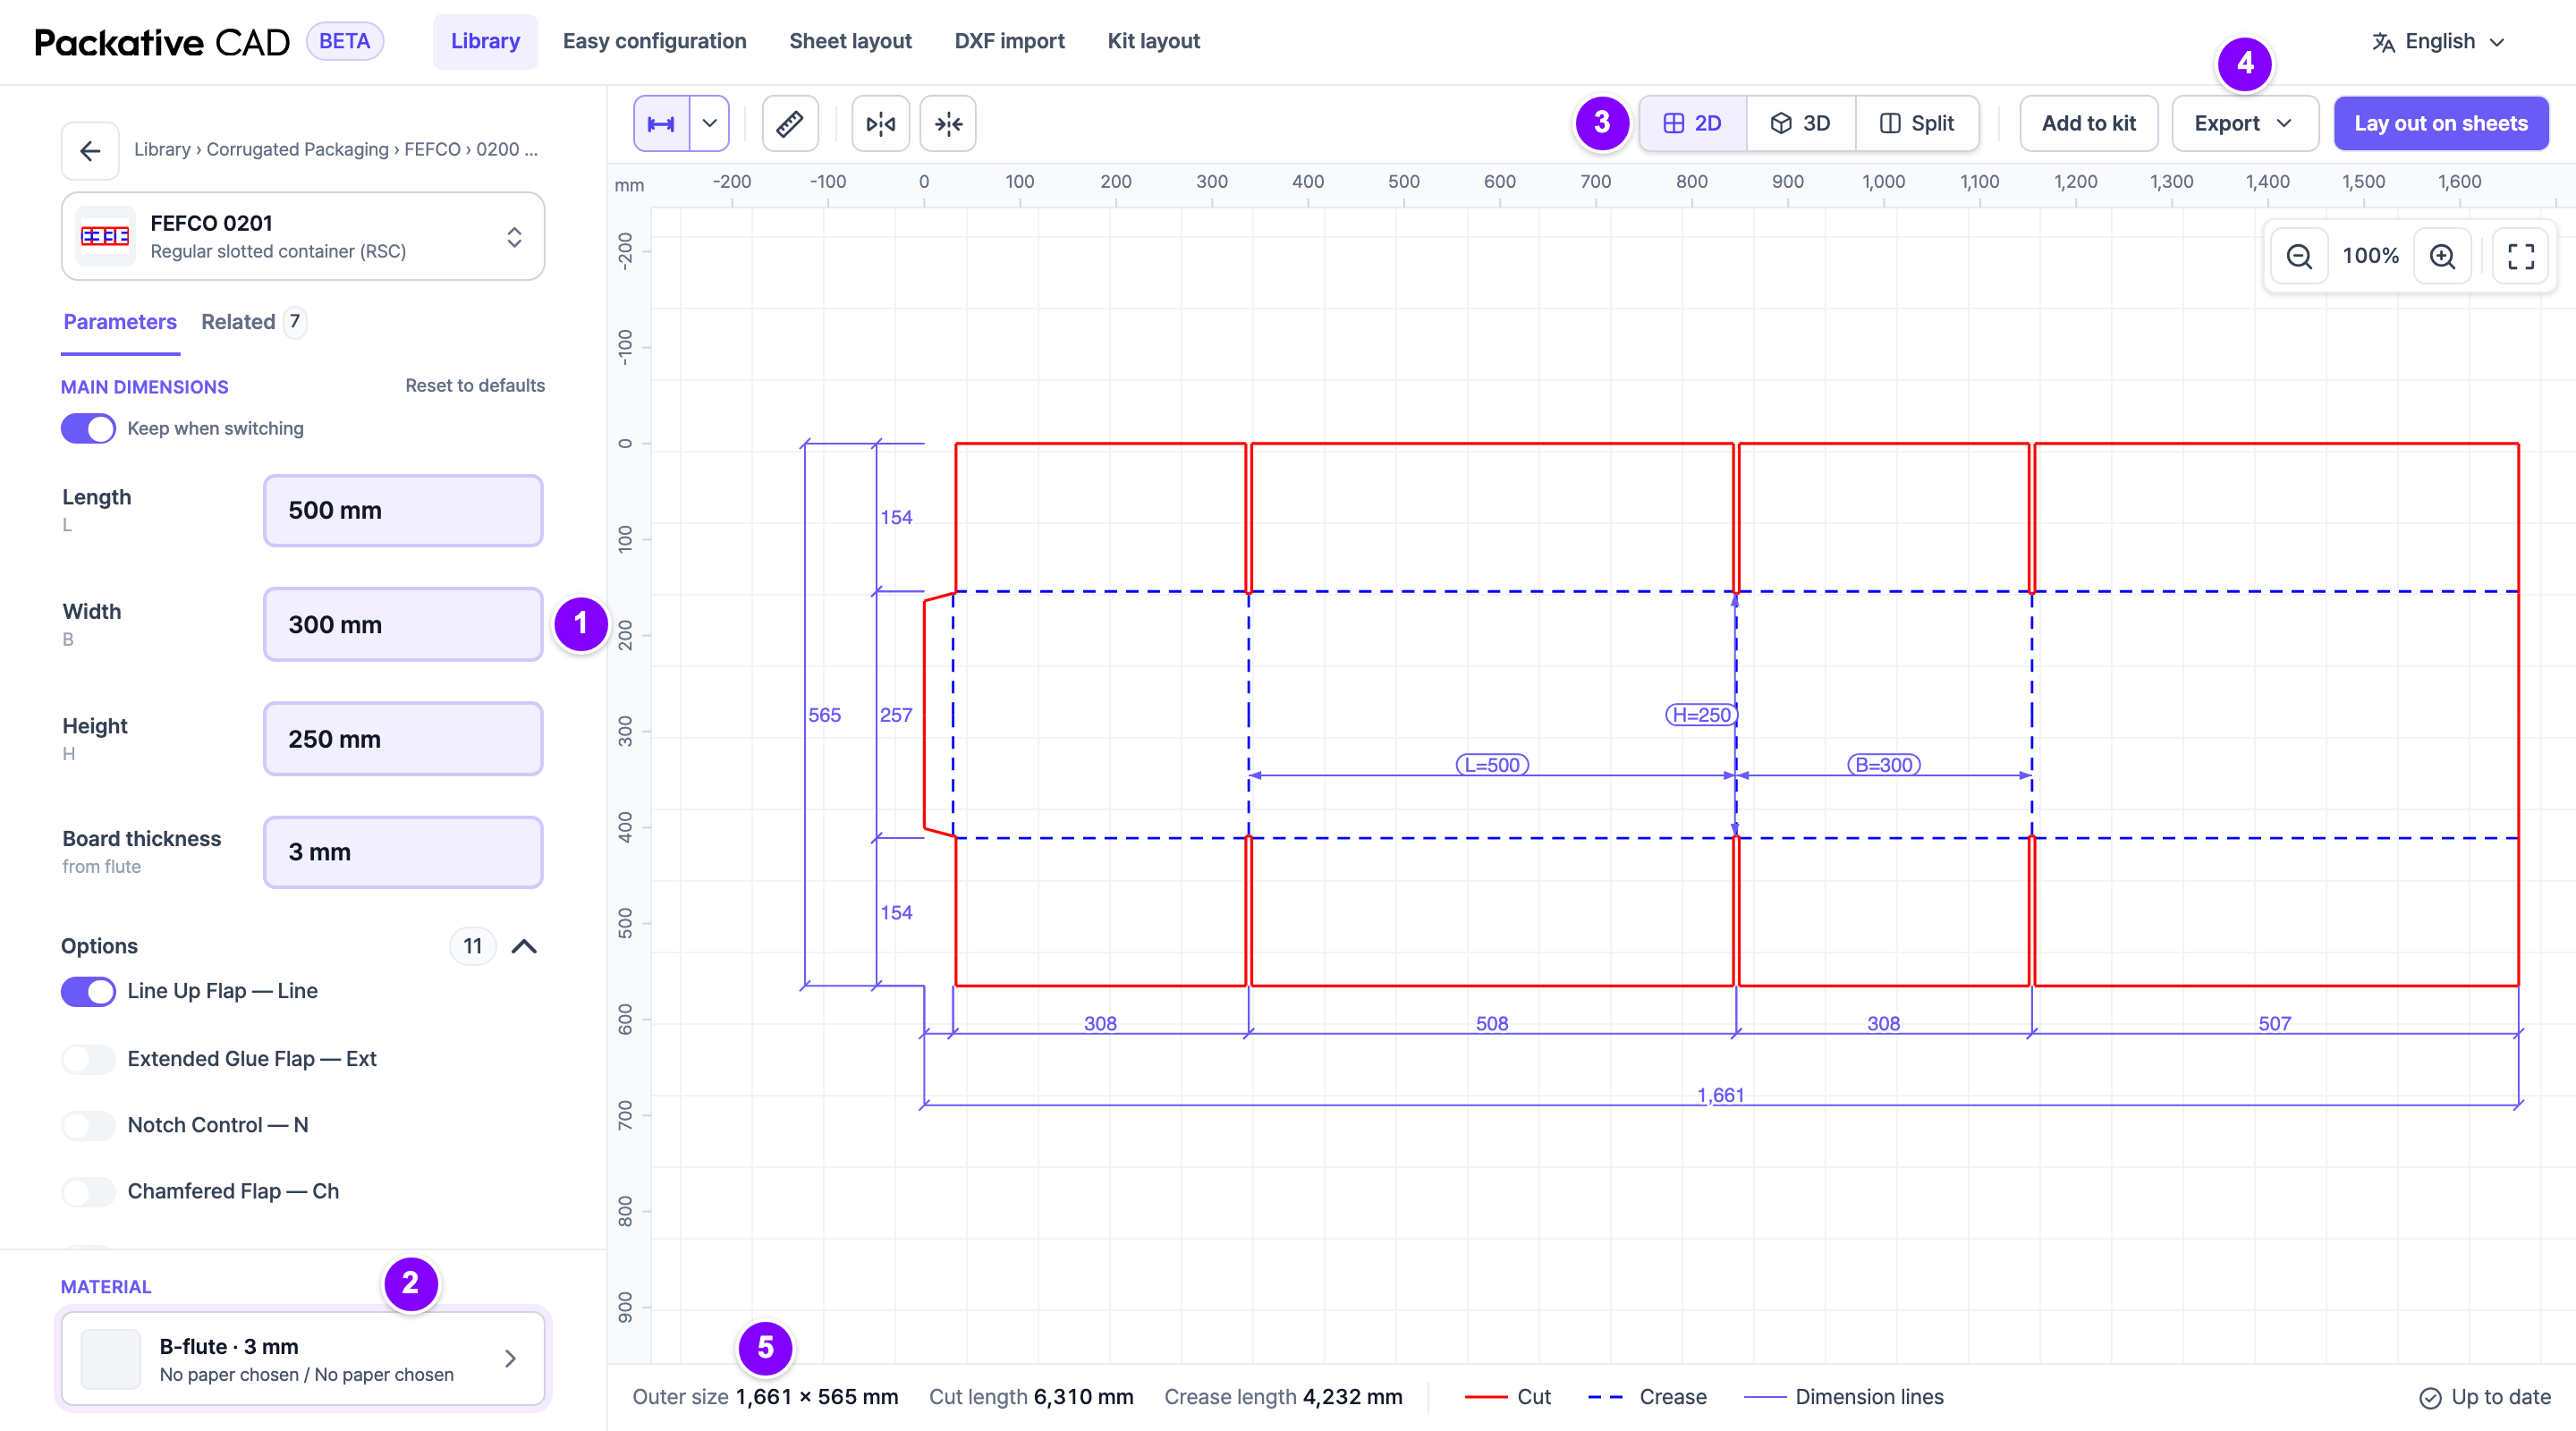
The box screen with your sizes and board on the left and the dieline on the right. The numbers match the steps below.
## Steps
1. Open `https://cad.packative.one` and select **Continue with Google**.
2. Open **Library** in the bar at the top.
3. In the search box at the top left, type `0201`.
4. Select the card **FEFCO 0201 — Regular slotted container (RSC)**. The box screen
opens.
5. 1 Under **Main dimensions**, type the **Length**, **Width** and **Height** in
millimetres, for example 500, 300 and 250. The drawing changes as you type. The
small letters under the names (L, B, H) are the names used on the drawing. B is the
width.
6. 2 Under **Material** at the bottom left, select the board. In the window that
opens, select a **Flute**, for example **B-flute · 3 mm**, then select **Done**. The
flute is the wavy middle layer of corrugated board, and it sets how thick the board
is. **Board thickness** fills in from the flute, so leave it as it is.
7. 3 Optional: select **3D** in the bar above the drawing to see the box folded. Select
**2D** to go back.
8. 4 Select **Export** at the top right, above the drawing.
9. Select the **PDF** format card.
10. Select **Export PDF**. The file downloads to your computer.
The PDF is at true size, so you can print it 1:1 or send it to your printer.
## Good to Know
- Ask your printer or die maker whether your sizes are inside or outside sizes.
- 5 The bottom bar shows the **Outer size**: the size of the flat box before folding.
- Each step uses a few credits. Browsing the library is free. See
[Sign In and Credits](https://cad.packative.one/help/guide/account/).
- To share this box, copy the page address. It holds the box style and your sizes.
!!! tip "Change a size on the drawing"
Select a measurement on the drawing, type the new value and confirm with ++enter++.
!!! warning "Check before you make a die"
Not every dieline has been tested in production. Check the sizes and the file with
your die maker before a cutting tool is made.
## What Next
- Need a file for your die maker or for artwork? See
[Download Files for Print](https://cad.packative.one/help/guide/export/) for DXF and Illustrator files.
- Want to know how many boxes fit on a sheet? See
[Fit Boxes on a Sheet](https://cad.packative.one/help/guide/sheet-layout/).
---
# How To
Each page in this section covers one job in Packative CAD. New to the app? Start with
[Make Your First Box](https://cad.packative.one/help/get-started/quick-tour/).
| I want to... | Page |
|---|---|
| Find a box style for my product | [Find a Box Style](https://cad.packative.one/help/guide/library/) |
| Set the length, width and height of my box | [Set Your Box Size](https://cad.packative.one/help/guide/configurator/) |
| Choose the board or paper the box is made of | [Choose the Board or Paper](https://cad.packative.one/help/guide/materials/) |
| See the folded box and try my artwork on it | [See Your Box in 3D](https://cad.packative.one/help/guide/3d/) |
| Download a file for my die maker or printer | [Download Files for Print](https://cad.packative.one/help/guide/export/) |
| See how many boxes fit on one sheet | [Fit Boxes on a Sheet](https://cad.packative.one/help/guide/sheet-layout/) |
| Keep my own list of press sheets to pick from | [Manage Your Sheet Sizes](https://cad.packative.one/help/guide/sheet-sizes/) |
| Print a lid, a base and inserts together | [Print Several Parts Together](https://cad.packative.one/help/guide/kit-layout/) |
| Open a dieline file I already have | [Use Your Own Dieline File](https://cad.packative.one/help/guide/dxf-import/) |
| Set up a box by selecting pictures | [Quick Box Setup](https://cad.packative.one/help/guide/easy-configuration/) |
| Sign in and check my credits | [Sign In and Credits](https://cad.packative.one/help/guide/account/) |
| Work from a chat in Claude or ChatGPT | [Use It in Claude or ChatGPT](https://cad.packative.one/help/guide/ai-assistants/) |
A dieline is the flat drawing of your box, with lines for cutting and folding: red lines
are cut, blue dashed lines are creases (fold lines).
## Moving Around the App
- The bar at the top of the app has a tab for each screen: **Library**,
**Easy configuration**, **Sheet layout**, **DXF import** and **Kit layout**.
- The language menu switches between English, 한국어 and 日本語.
- **Kit · n** shows how many parts your kit holds.
- Each screen has its own address, so the back button and bookmarks work.
!!! note "About the pictures"
The pictures come from a test copy of the app. Where they show **Local** at the top
right, you see your name.
!!! note "Credits"
On the hosted app you sign in with Google. Browsing is free. Drawing, 3D, layouts and
downloads use credits from a monthly allowance. See [Sign In and Credits](https://cad.packative.one/help/guide/account/).
---
# Find a Box Style
The **Library** holds ready-made box styles. You find the one that fits your product here,
then set its size in the next step.
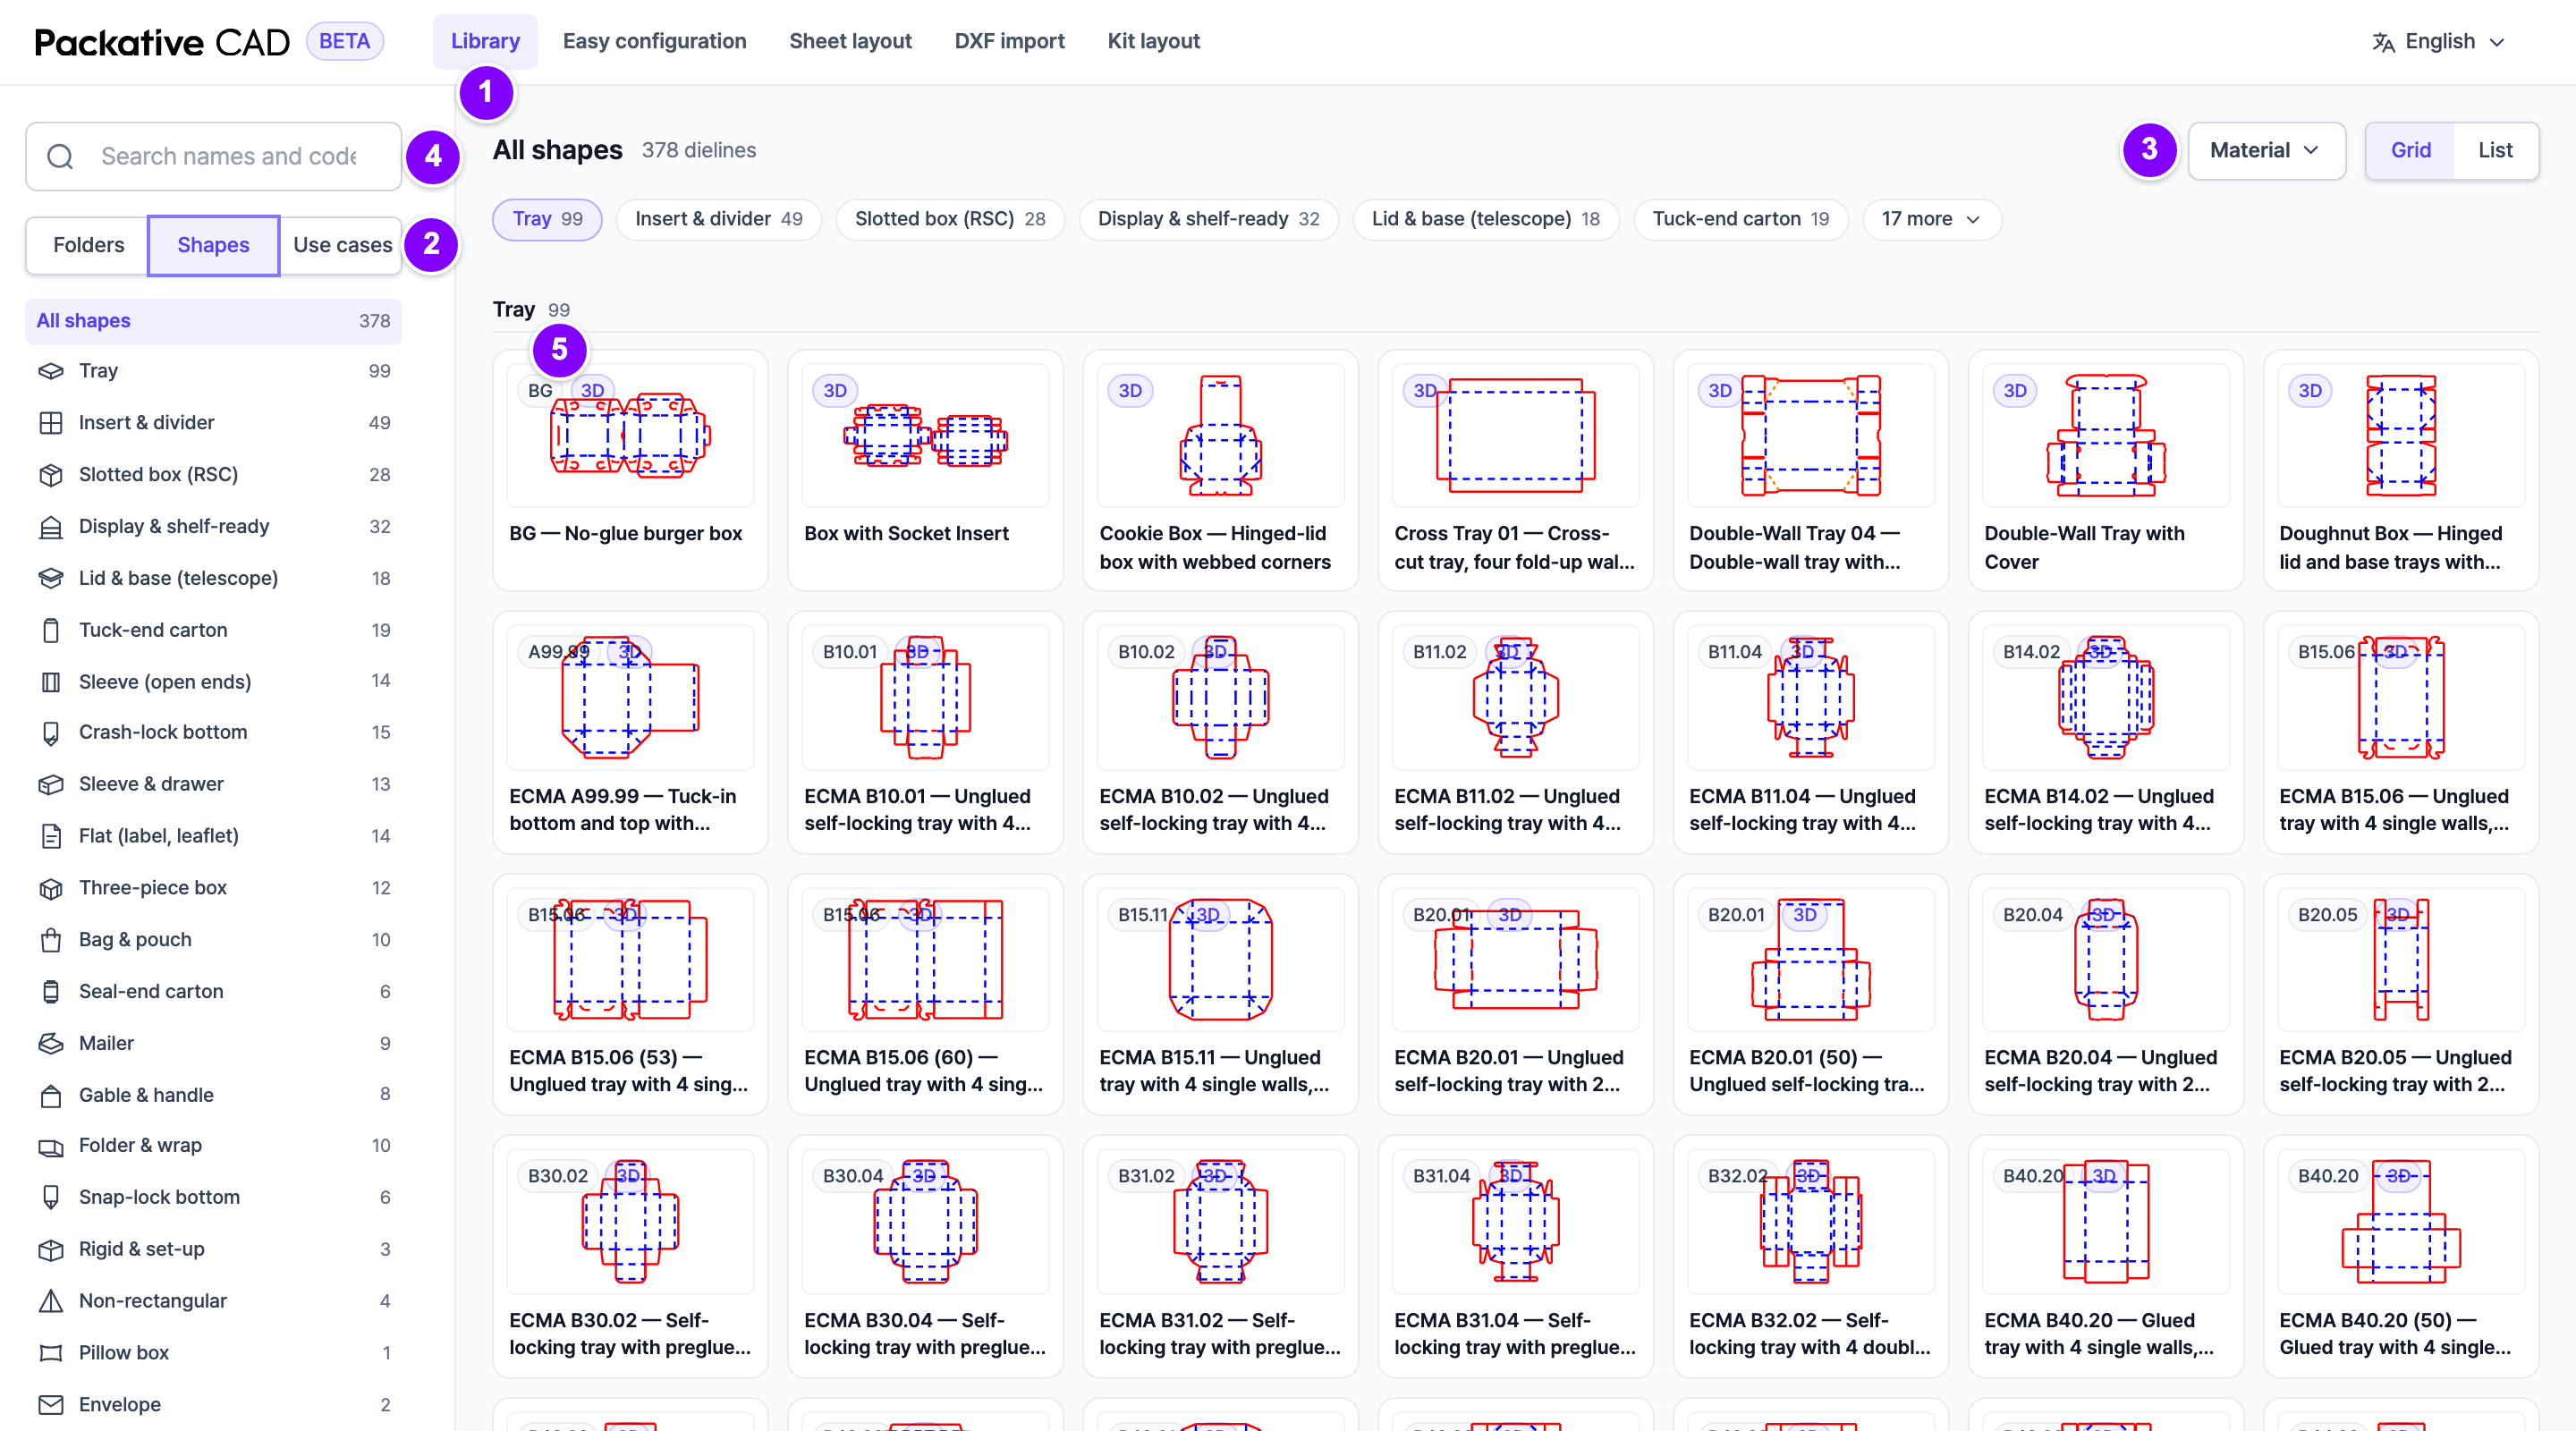
The Library with the sidebar to browse on the left and the box style cards on the right. The numbers match the steps below.
## Find and Open a Box Style
1. 1 Open **Library** in the bar at the top.
2. 2 Below the search box, select how you want to look:
- **Shapes**: by the kind of box, for example **Mailer** or **Tuck-end carton**.
- **Use cases**: by what the box is for, for example **Food & takeaway**.
- **Folders**: by the industry's standard codes.
3. 3 Optional: in **Material** at the top right, select the material you want, for example
**Corrugated board** or **Folding carton**.
4. 4 Or type a name or code in the search box at the top left, for example `mailer` or `0201`.
5. 5 Select a card to open the box style. Next, [set your box size](https://cad.packative.one/help/guide/configurator/).
## Good to Know
- Each card shows a small picture of the box style, its name and its code.
- A **3D** tag means you can see the box folded in [3D](https://cad.packative.one/help/guide/3d/).
- **Clear filters** and **Clear search** show all box styles again.
- A box style that fits no group is under **Others**.
!!! tip "Try a similar box style"
You do not need to go back to the Library. In the box style's panel, select its
title to switch to another one, or open the **Related** tab. Your length, width and
height stay the same.
---
# Set Your Box Size
When you open a box style, you see its dieline: the flat drawing of your box, with lines
for cutting and folding. You type your sizes on the left, and the dieline updates on the
right.
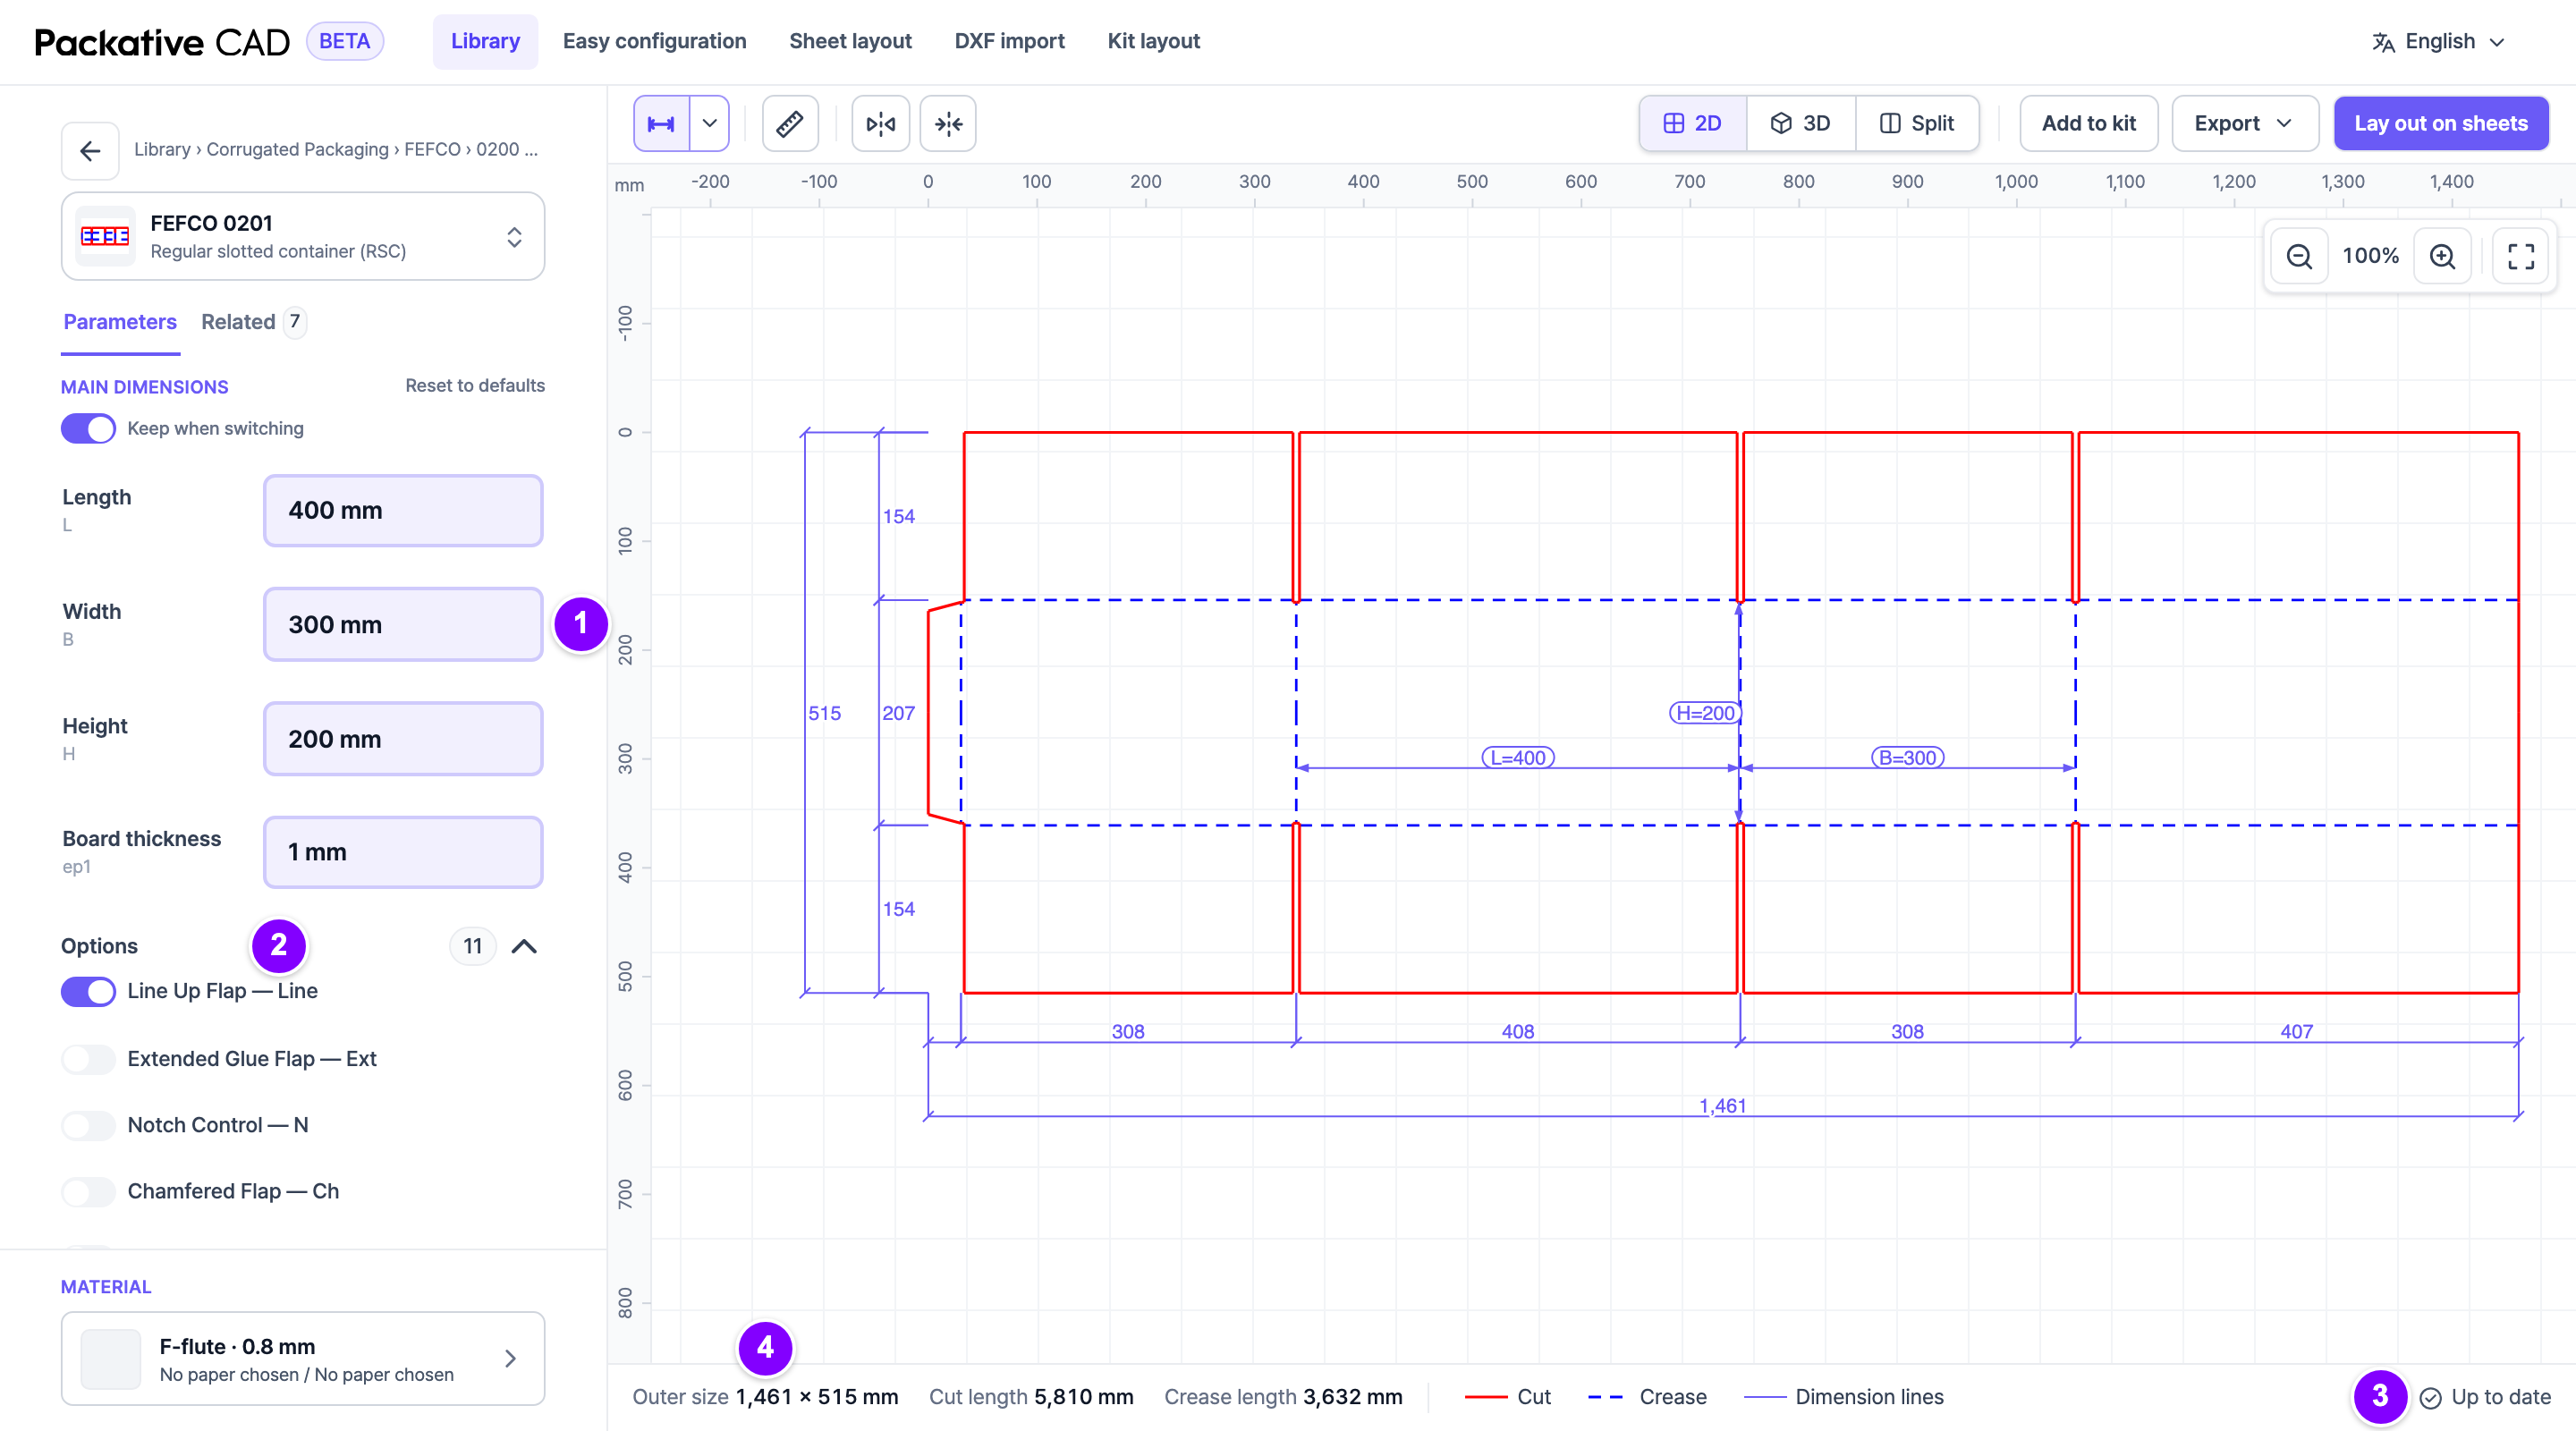
Your sizes on the left, the dieline on the right, and the totals at the bottom. The numbers match the steps below.
## Set the Size
1. 1 Under **Main dimensions**, type the **Length**, **Width** and **Height**, in mm.
The small letters under the names (L, B, H) are the names used on the dieline. B is
the width. **Board thickness** fills in from the flute, so leave it as it is.
2. 2 Open **Options** to change things like the closure style or handholds.
3. 3 Wait until the bottom right corner says **Up to date**.
4. 4 Check the **Outer size** at the bottom left. This is the size of the flat box.
5. Next, [choose the board or paper](https://cad.packative.one/help/guide/materials/).
!!! tip "Move on with Enter"
After you type a size, ++enter++ keeps it and moves to the next size; ++shift+enter++
goes back. In the last size, ++enter++ keeps the value and stays there. ++enter++ skips
lists and switches; ++tab++ works as before and reaches them too. While your keyboard
is converting text (Japanese input), ++enter++ only confirms the conversion.
!!! tip "Change a size on the dieline"
Select a size on the dieline to change it in place. ++enter++ keeps the new value,
++esc++ cancels.
!!! tip "Inside or outside sizes?"
Ask your printer or die maker whether your sizes are inside or outside sizes.
## Good to Know
- **Reset to defaults** brings back the starting sizes. **Undo** brings yours back.
- A size that is too large or too small is held at the limit. A note tells you the limit.
- **Dimensions** shows or hides the sizes on the dieline. Its arrow offers
**Main dimensions** or **All dimensions**. Your downloads follow this choice.
- **Measure** checks a distance or angle on the dieline.
- **Flip horizontally** and **Flip vertically** mirror the dieline.
- Some box styles have several pieces, such as a lid and a base. Use **Pieces** to see
one piece at a time.
- The page address keeps all your choices. Share the link and the same box opens.
## If Something Goes Wrong
!!! warning "A warning above the dieline"
A warning tells you what to check, for example "*n* crease lines run past the cut
outline." Check your sizes. You can still download the file.
If the screen says "This dieline could not be drawn with these values.", change a size or
select **Back to last working values**. When a template does not allow a combination (for
example a flute that cannot take the stopper), the message says why and what to change.
---
# Choose the Board or Paper
The board is the material your box is made of. Your choice sets how thick the board is,
so the panels fit when the box folds. It also sets the colour of the box in 3D.
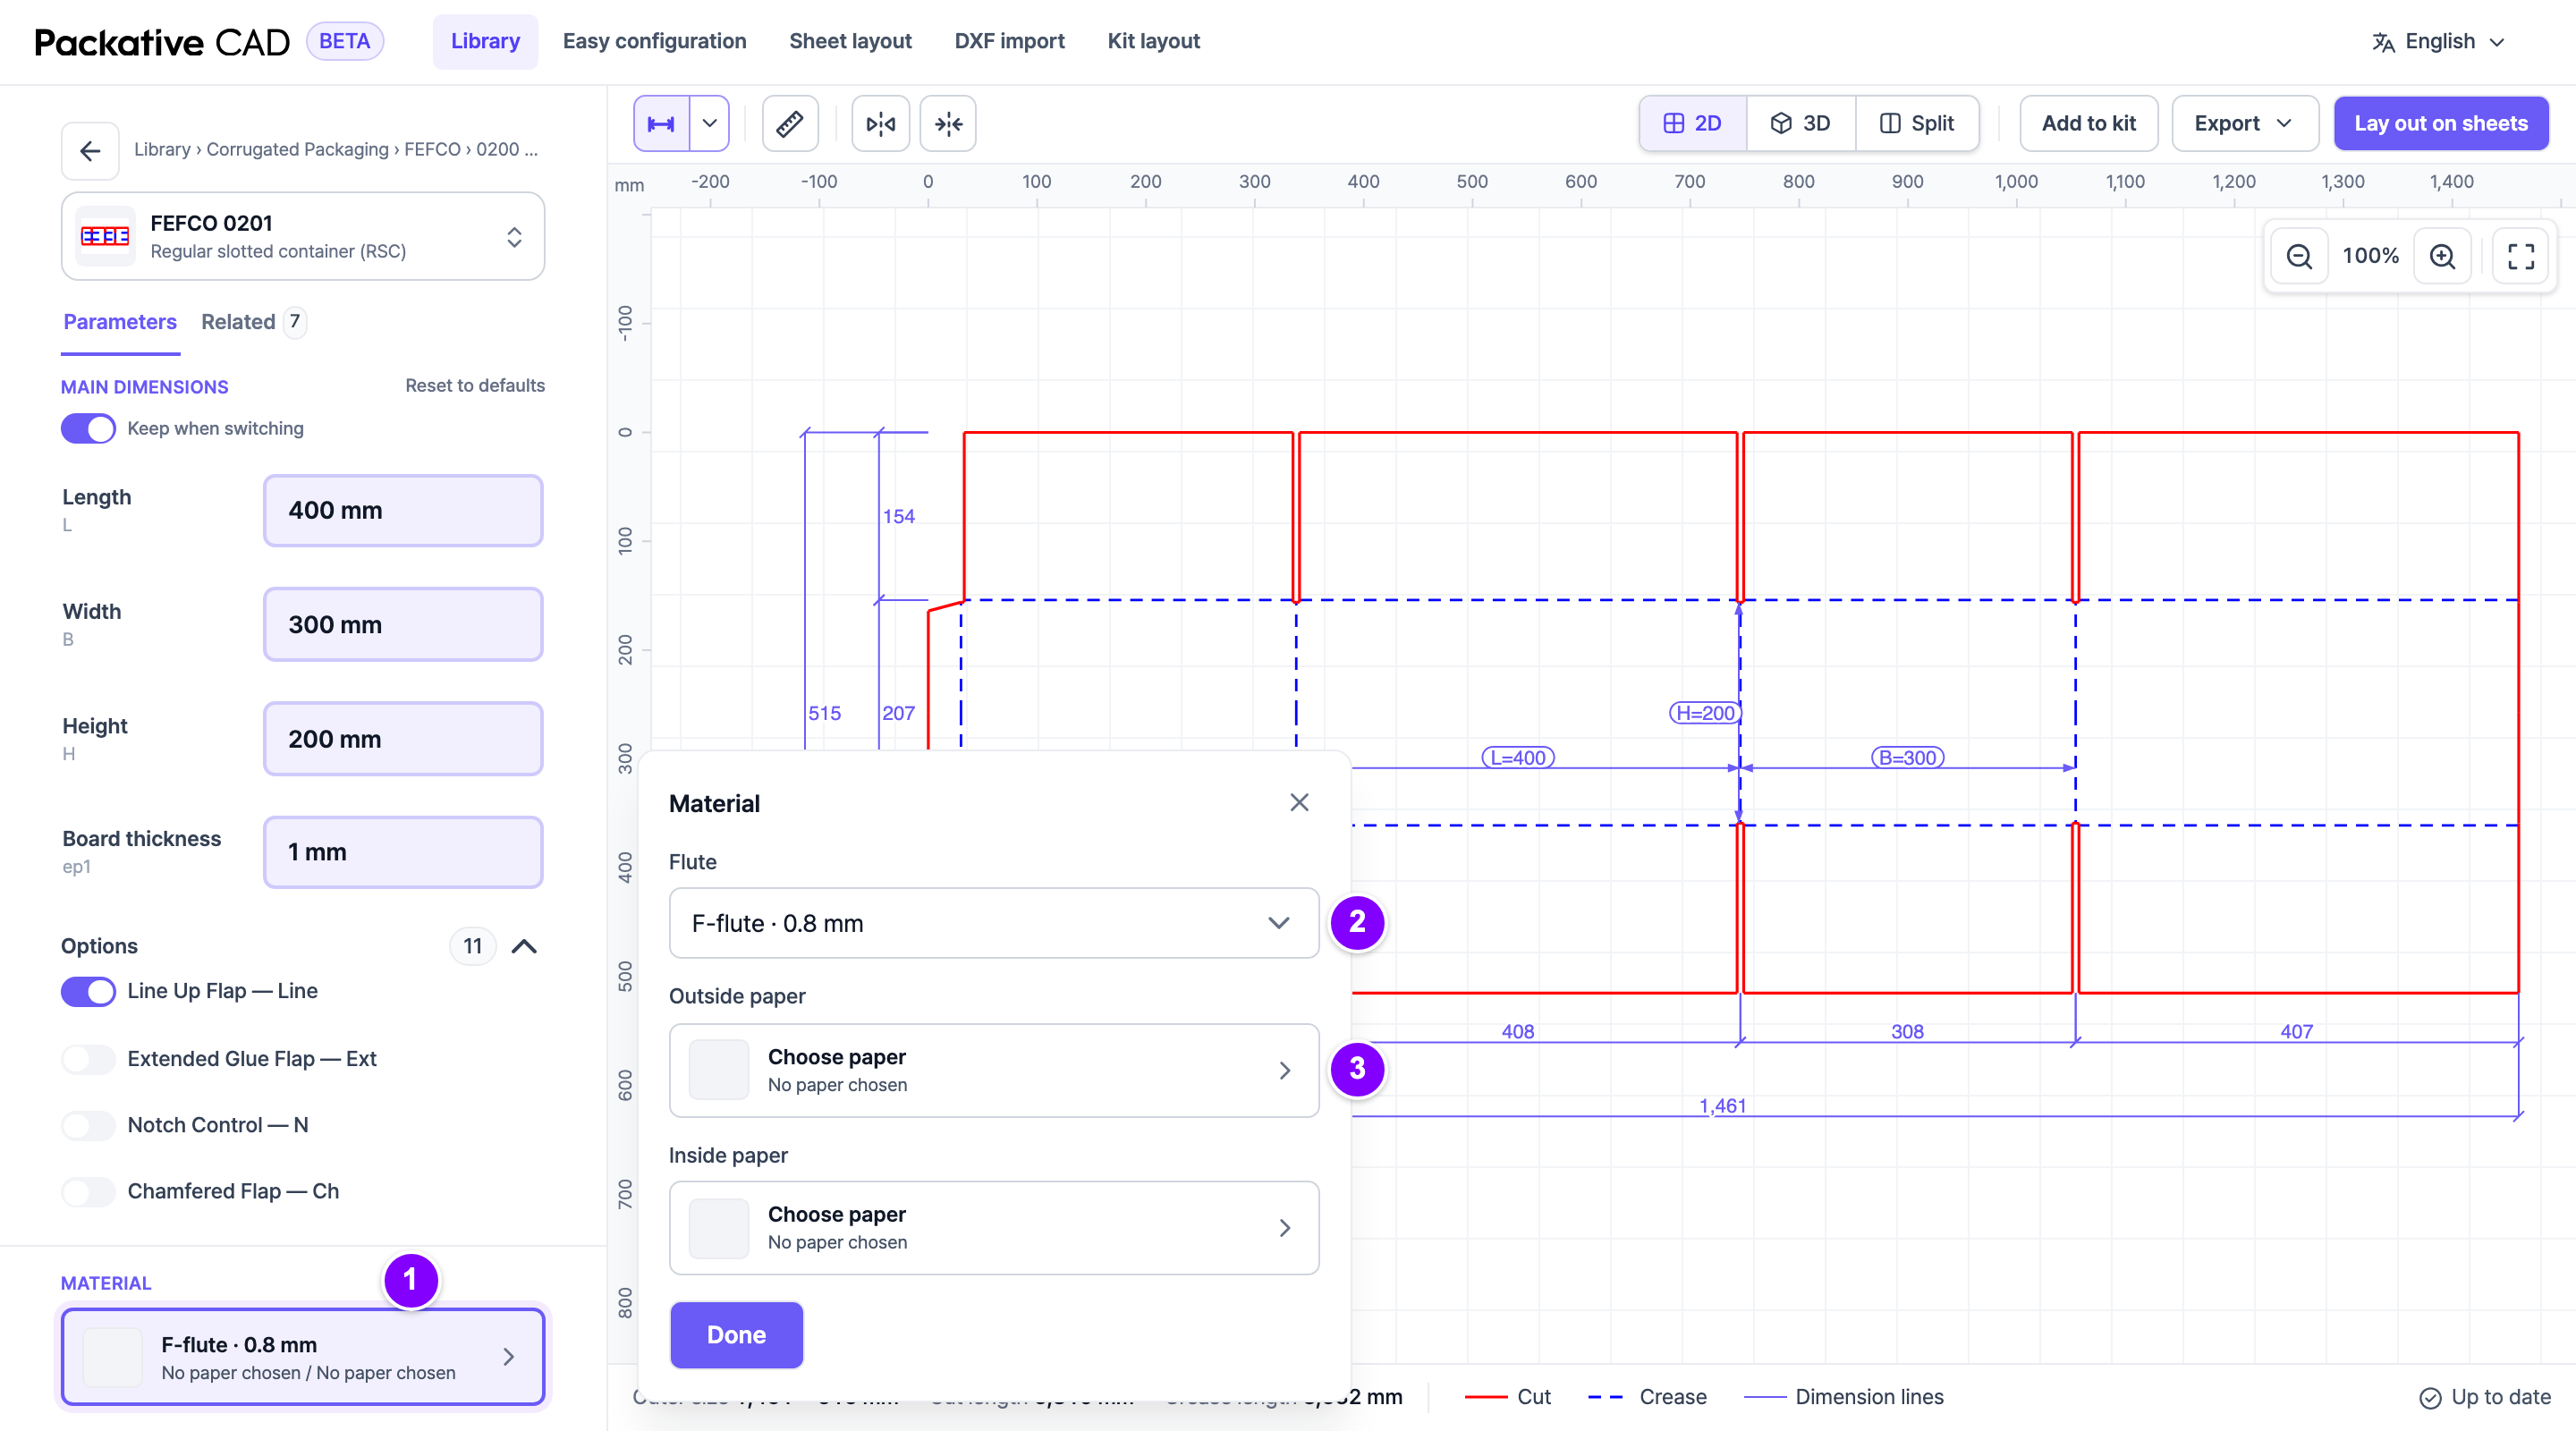
The board under Material at the bottom of the left panel, with its window open. The numbers match the steps below.
## Choose the Board
1. 1 Open a box style. Under **Material** at the bottom of the left panel, select
the board. A window opens.
2. 2 For corrugated board, select a **Flute**. The flute is the wavy layer between the
outside and the inside paper. Each flute gives the board its own thickness.
3. 3 Under **Paper**, **Outside paper** or **Inside paper**, select **Choose paper**.
The paper catalogue opens.
4. 4 Find a paper: type a name, maker or product code in the search box at the top,
or browse **Common papers**.
5. 5 Select the paper, then select **Use this paper** on the right.
6. Select **Done** to close the window.
7. Check **Board thickness**. It now follows your flute or paper.
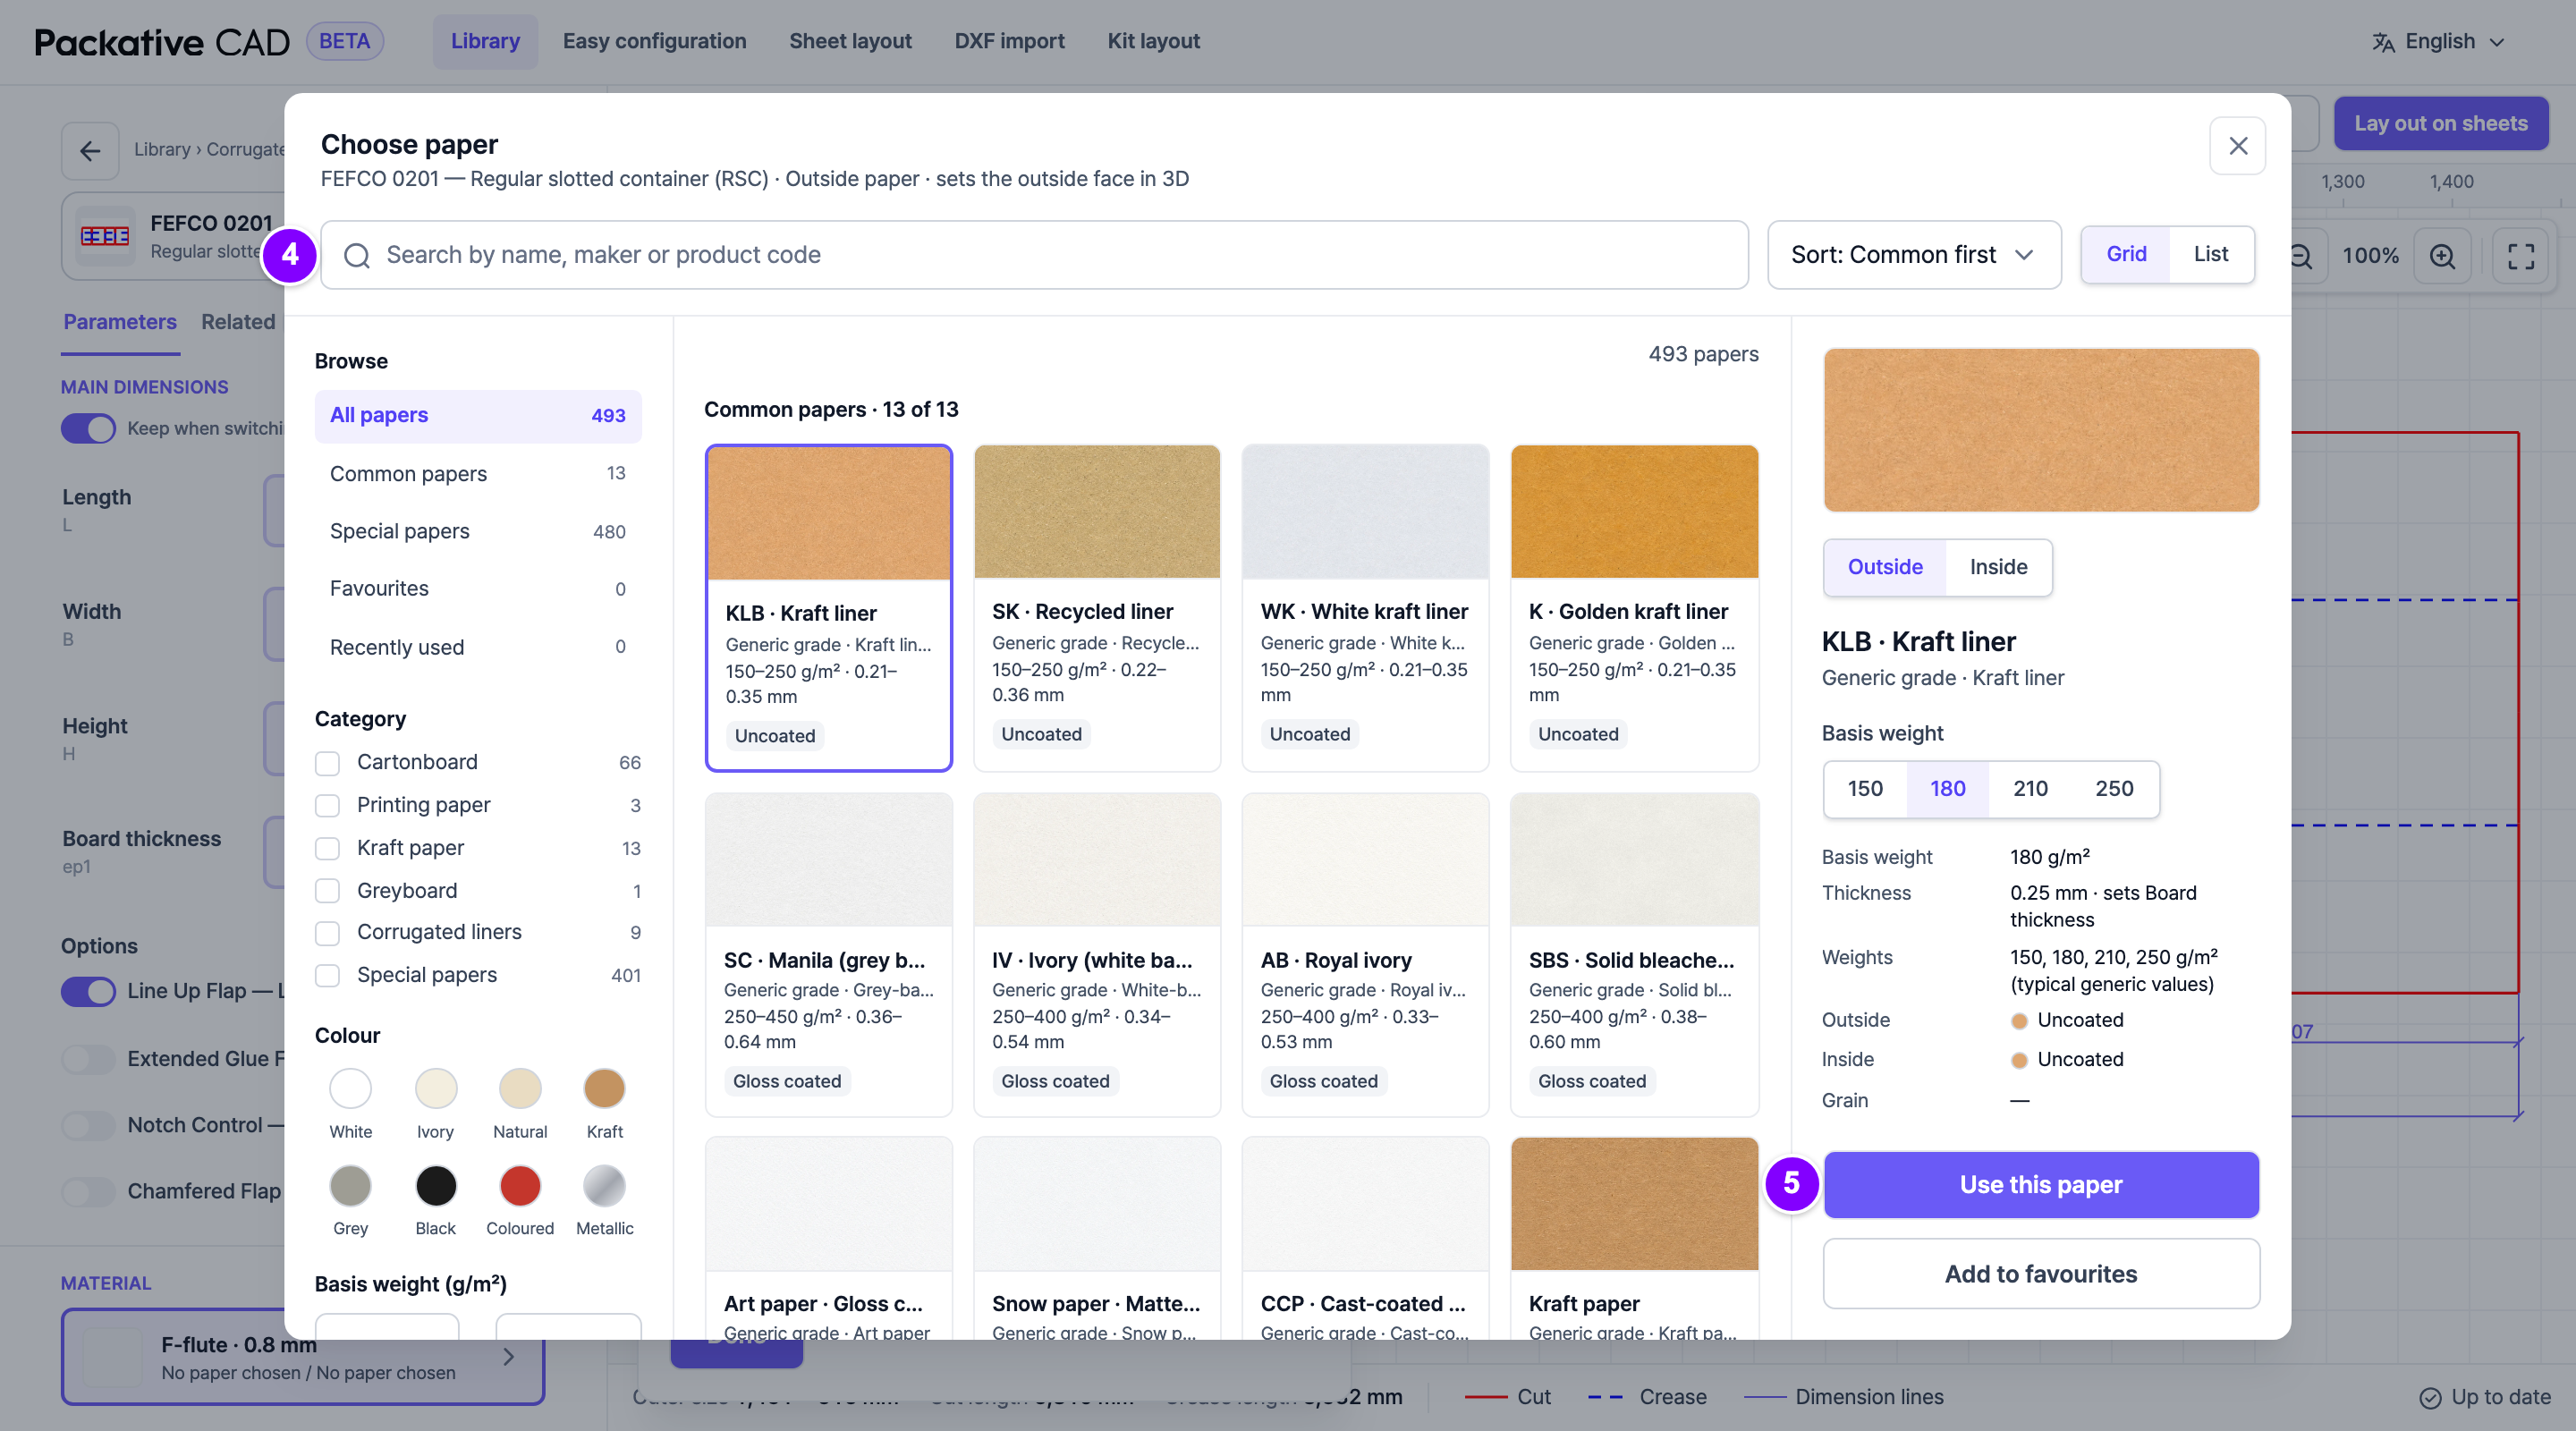
The paper catalogue, with a paper selected. The numbers match steps 4 and 5.
## Good to Know
- Use the filters, for example **Maker**, **Colour** or **Eco and use**, to narrow the
list. **Clear all** removes them.
- Select a paper to see its details: maker, weight, thickness, finish and where it is
sold.
- Papers marked "(typical)" show common trade values, not a maker's exact values.
- **Add to favourites** keeps a paper under **Favourites** in this browser.
- You can type your own **Board thickness**. **Reset to defaults** goes back to the
paper's or flute's value.
- Your board choice carries on to 3D, sheet layouts and kit layouts.
!!! note "Papers from other countries"
In Korean or Japanese, papers not sold in that country are marked, for example
"Not sold in Korea", and listed last. They are never hidden.
!!! note "Flutes by region"
The **Flute** list follows the **Region** you pick (the language alone does not change
it). With Japan picked it lists the Japanese flutes:
G flute (GF) 1 mm, E flute (EF) 1.5 mm, B flute (BF) 3 mm, A flute (AF) 5 mm and
Double wall (WF) 8 mm. Otherwise it lists F, E, B and C flute and
the EB and BC double walls. A flute you chose in another region stays in the list.
Your company can set the region for everyone in your workspace; you then don't see the
**Region** choice.
!!! note "The material can change by itself"
If you select a paper of another material, the box style switches to that material.
A message says "Material changed to … to match the paper."
To add a matte or glossy finish to the box, see [See Your Box in 3D](https://cad.packative.one/help/guide/3d/).
---
# See Your Box in 3D
The 3D view folds your dieline into a box. You can turn it, try your print design on it
and download a picture or a 3D model to share.
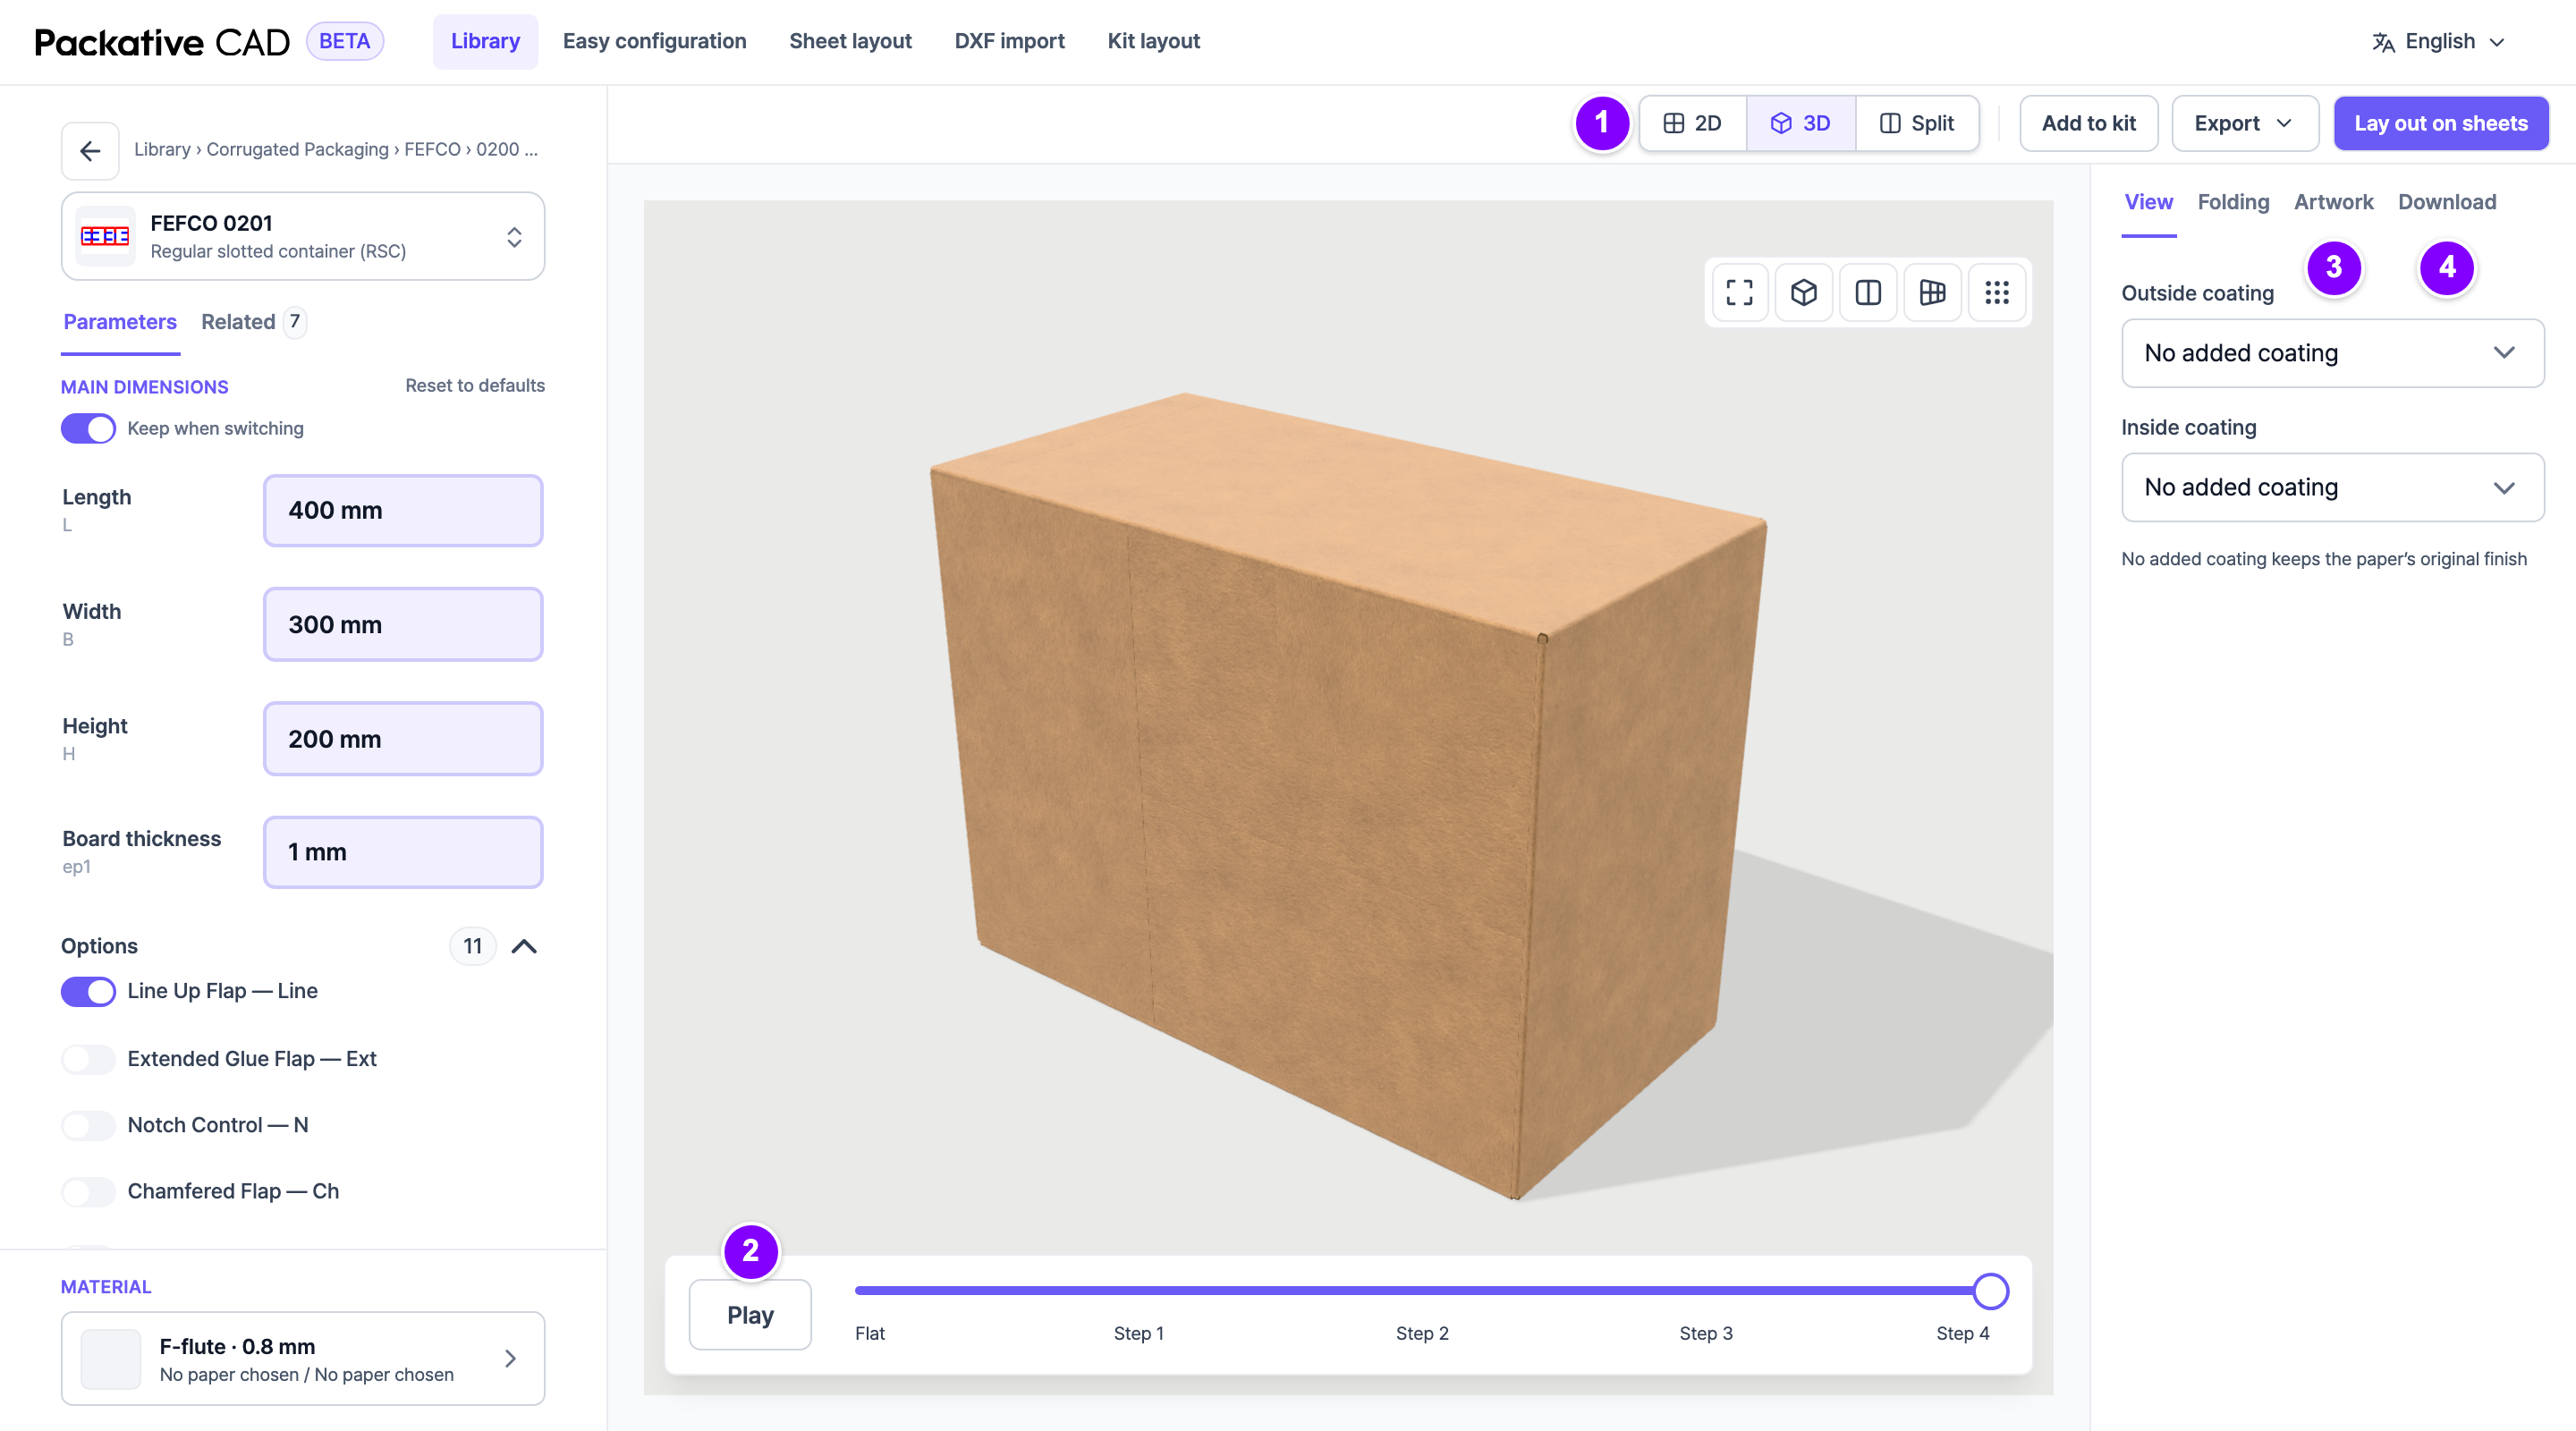
The folded box in the 3D view, with the View, Folding, Artwork and Download tabs on the right. The numbers match the steps below.
## See the Folded Box
1. Open a box style and set your size.
2. 1 In the bar above the dieline, select **3D**. **Split** shows the flat dieline and the
box side by side.
3. 2 Drag the box to turn it. Select **Play** to watch it fold, or drag the slider
below the box from **Flat** to the last step.
4. 3 To try your print design, open the **Artwork** tab in the right panel. Select
**Outside artwork**, then select your file (PNG, JPEG, WebP, SVG or PDF).
5. 4 To share the box, open the **Download** tab and select **Download PNG**.
!!! warning "Check the folding"
The app works out the folding by itself, and nobody checks every box style by hand.
Check the folded box before you rely on it.
## Good to Know
- The box takes its colours from the papers you selected under
[Material](https://cad.packative.one/help/guide/materials/).
- In the **View** tab you can add a **Matte** or **Glossy** coating to each side.
- If your artwork reads the wrong way, select **Mirror artwork**.
- Your artwork stays in your browser. It is never uploaded.
- Artwork made on the PDF you downloaded lines up with the box by itself.
- The **Download** tab offers **Download PNG** (a picture of the current view),
**3D model (GLB)** for 3D apps, **AR model (USDZ)** for iPhone or iPad, and
**Web viewer (HTML)**, a web page that shows the box in any browser.
- **Download PNG** uses 1 credit for each picture. **3D model (GLB)**, **AR model
(USDZ)** and **Web viewer (HTML)** use 10 credits each time, like any other download.
For what uses credits, see [Sign In and Credits](https://cad.packative.one/help/guide/account/).
- Flat pieces, such as labels, do not fold, so they have no 3D view.
## If Something Goes Wrong
- **A flap folds the wrong way.** In the **Folding** tab, select the crease (the fold line) and change
its **Angle (°)**. **Reset to defaults** undoes your changes. Please also tell the
Packative team.
- **"This dieline has no fold lines we can follow."** The dieline has no fold lines, so
it cannot fold. For your own file, see [Use Your Own Dieline File](https://cad.packative.one/help/guide/dxf-import/).
- **The 3D view does not show.** Use a current Chrome, Edge or Safari.
---
# Download Files for Print
When your box is ready, you download its dieline as a file. You send this file to your
die maker, your printer or the designer who makes the artwork.
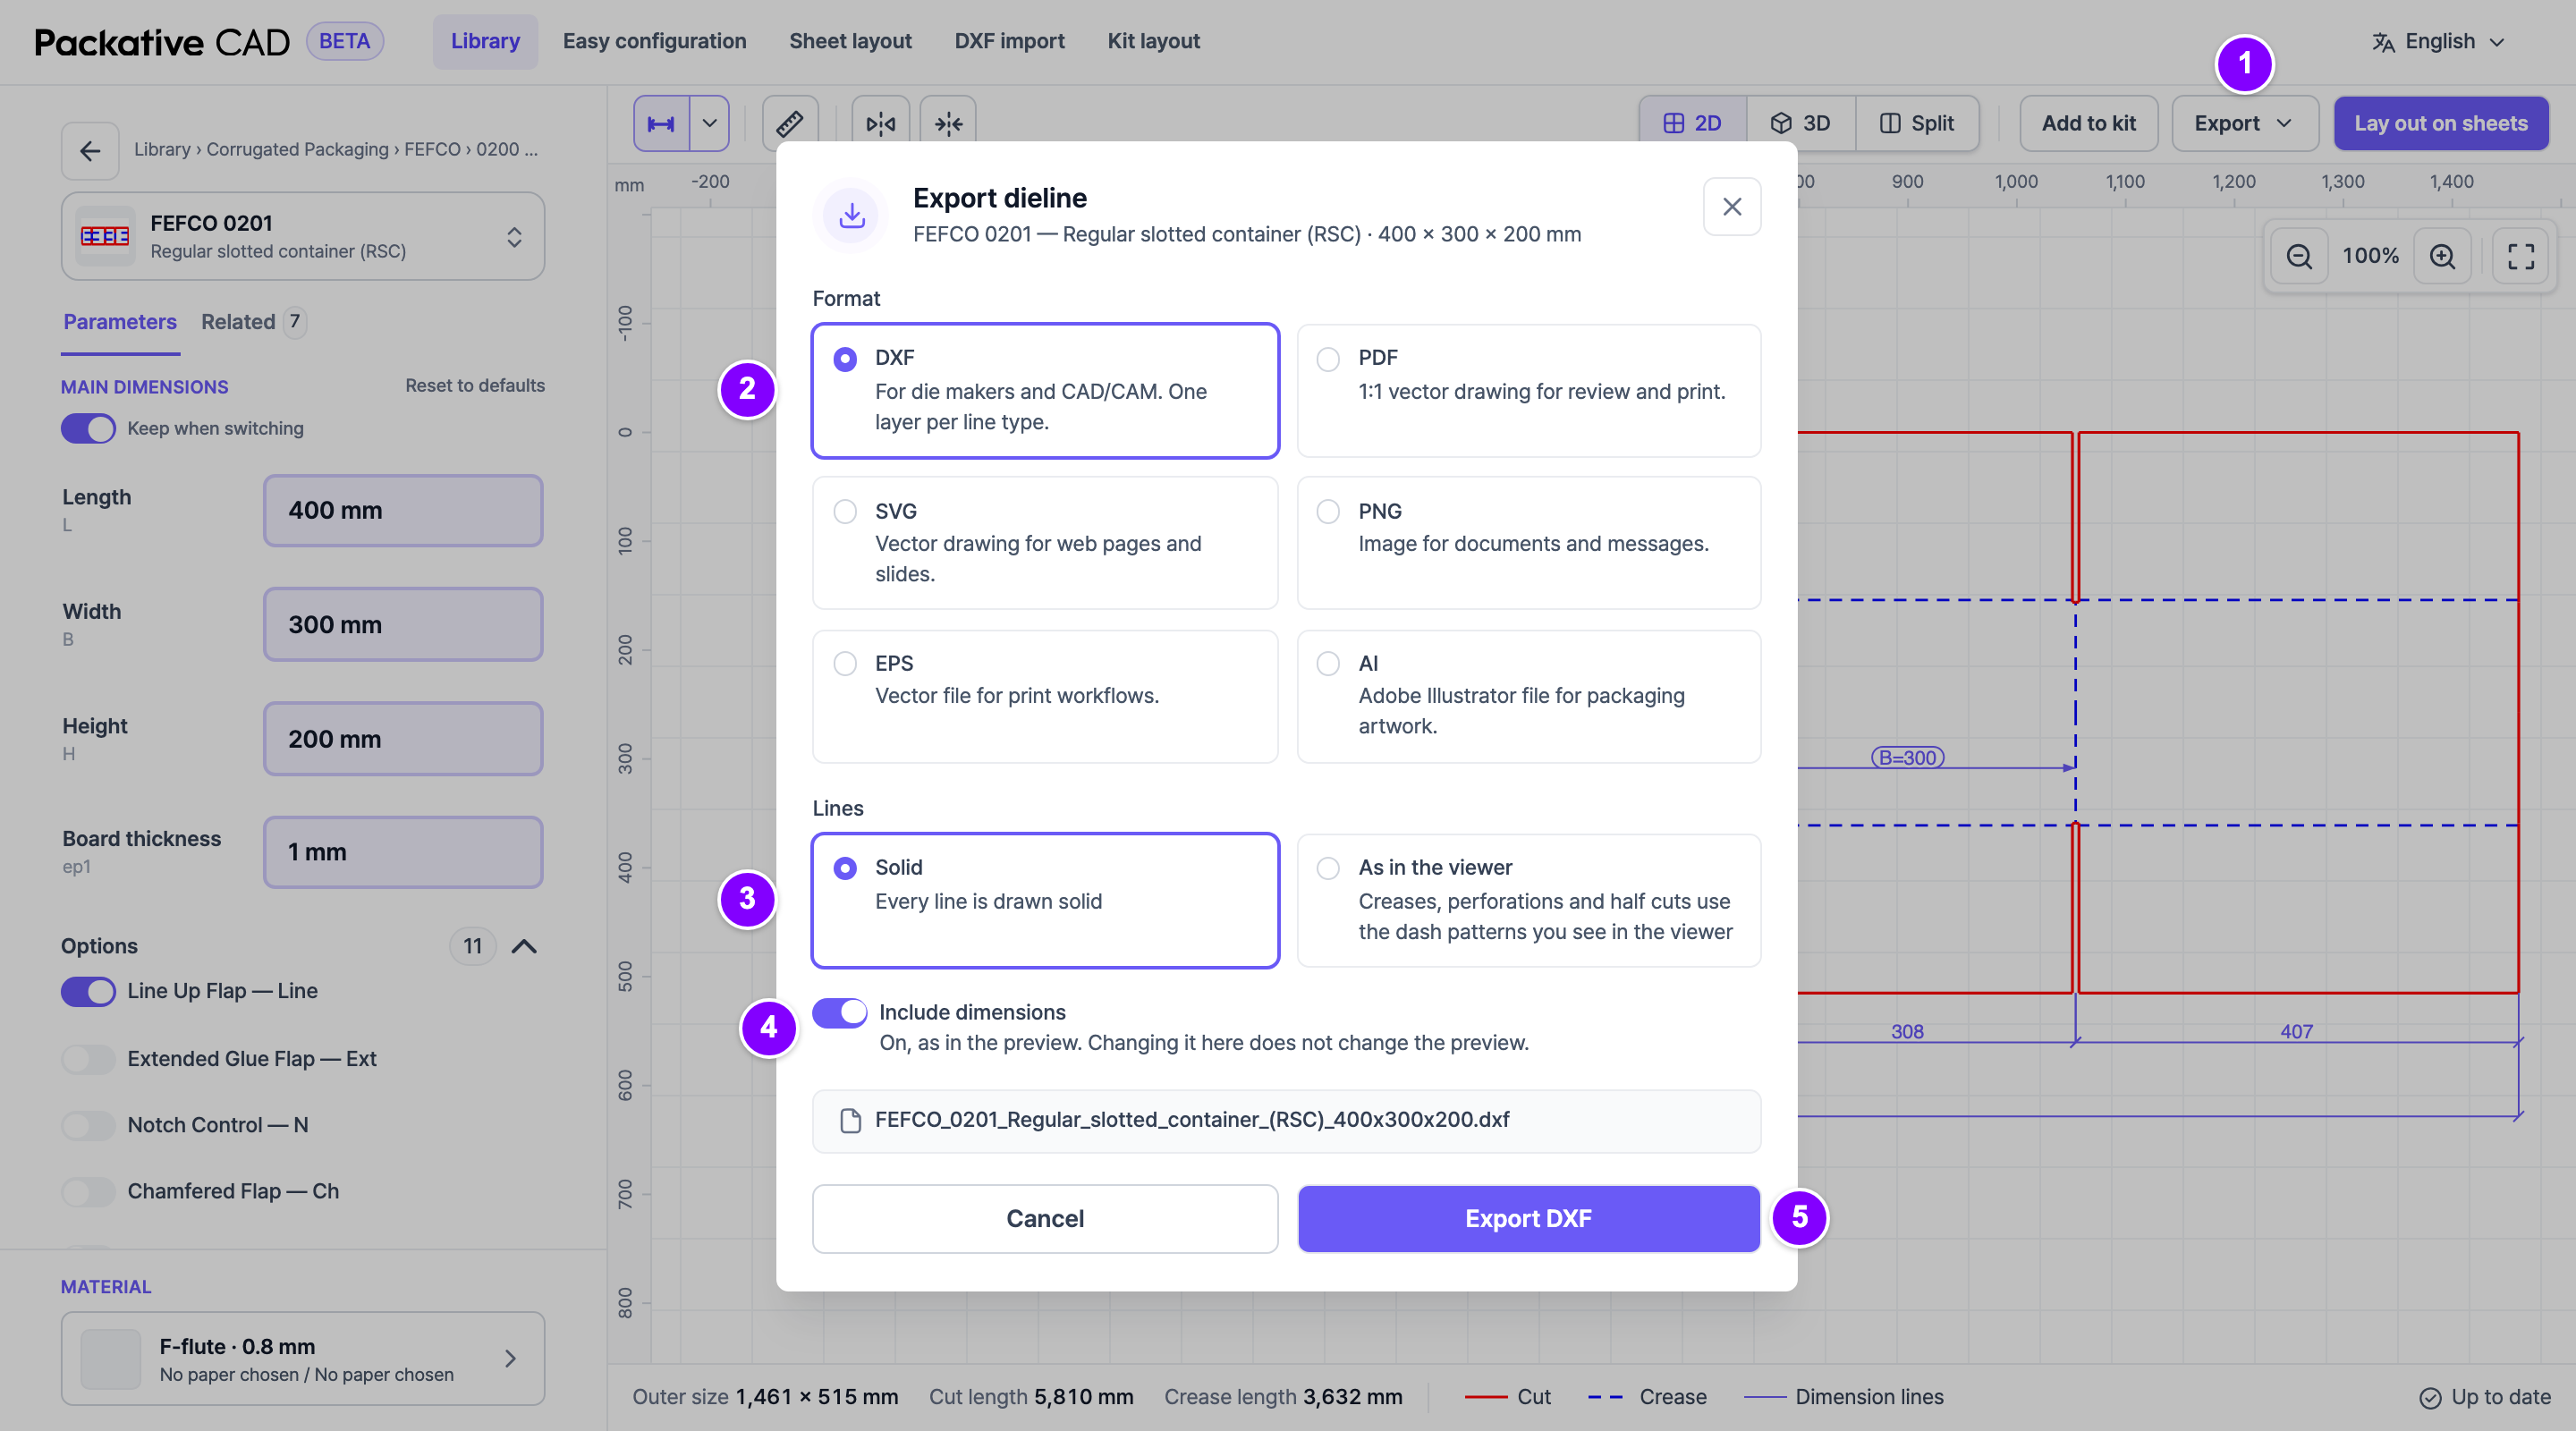
The Export dieline dialog, with the format cards at the top. The numbers match the steps below.
## Download the Dieline
1. 1 In the bar above the dieline, select **Export**.
2. 2 Select a **Format** card. The table below helps you decide.
3. 3 Under **Lines**, select **Solid** for plain lines, or **As in the viewer** for dashed fold lines.
For a customer PDF, **As in the viewer** shows fold lines dashed, like on screen.
4. 4 Select **Include dimensions** if you want the sizes on the file.
5. 5 Select **Export DXF** (the label follows your format, for example **Export PDF**).
The file downloads with your box name and sizes.
## Which Format to Use
| You send it to | Format |
|---|---|
| A die maker (the company that makes the cutting tool) | **DXF** |
| A designer who works in Adobe Illustrator | **AI** |
| Someone who checks or prints it at full size | **PDF** |
| A printer who asks for EPS | **EPS** |
| A web page or a slide | **SVG** |
| An email or a chat message | **PNG** |
DXF, PDF, AI and EPS are true to scale, so you can measure on them. SVG and PNG are
pictures for sharing.
## Good to Know
- The file uses the same sizes, board and flip that you see on screen.
- Lines have the same colours as on screen: cut lines red, fold lines blue.
- The AI file has an empty `ARTWORK` layer for the print design. Hide or delete the
`DIMENSIONS` layer before you send the file to print.
- Sheet layouts and kit layouts have their own **Download sheet** menu. See
[Fit Boxes on a Sheet](https://cad.packative.one/help/guide/sheet-layout/).
- 3D pictures and models are in the 3D view. See [See Your Box in 3D](https://cad.packative.one/help/guide/3d/).
- On the hosted app every download uses credits. See [Sign In and Credits](https://cad.packative.one/help/guide/account/).
!!! warning "Check before a cutting tool is made"
This is a free beta, and not every dieline has been tested in production. Check the
sizes and the file with your die maker first.
## If Something Goes Wrong
If the file cannot be made, the dialog keeps your choices. Select **Try again**.
---
# Fit Boxes on a Sheet
**Sheet layout** shows how many copies of one dieline fit on each of your press sheets.
You enter your sheet sizes, and the app lists the results, best first.
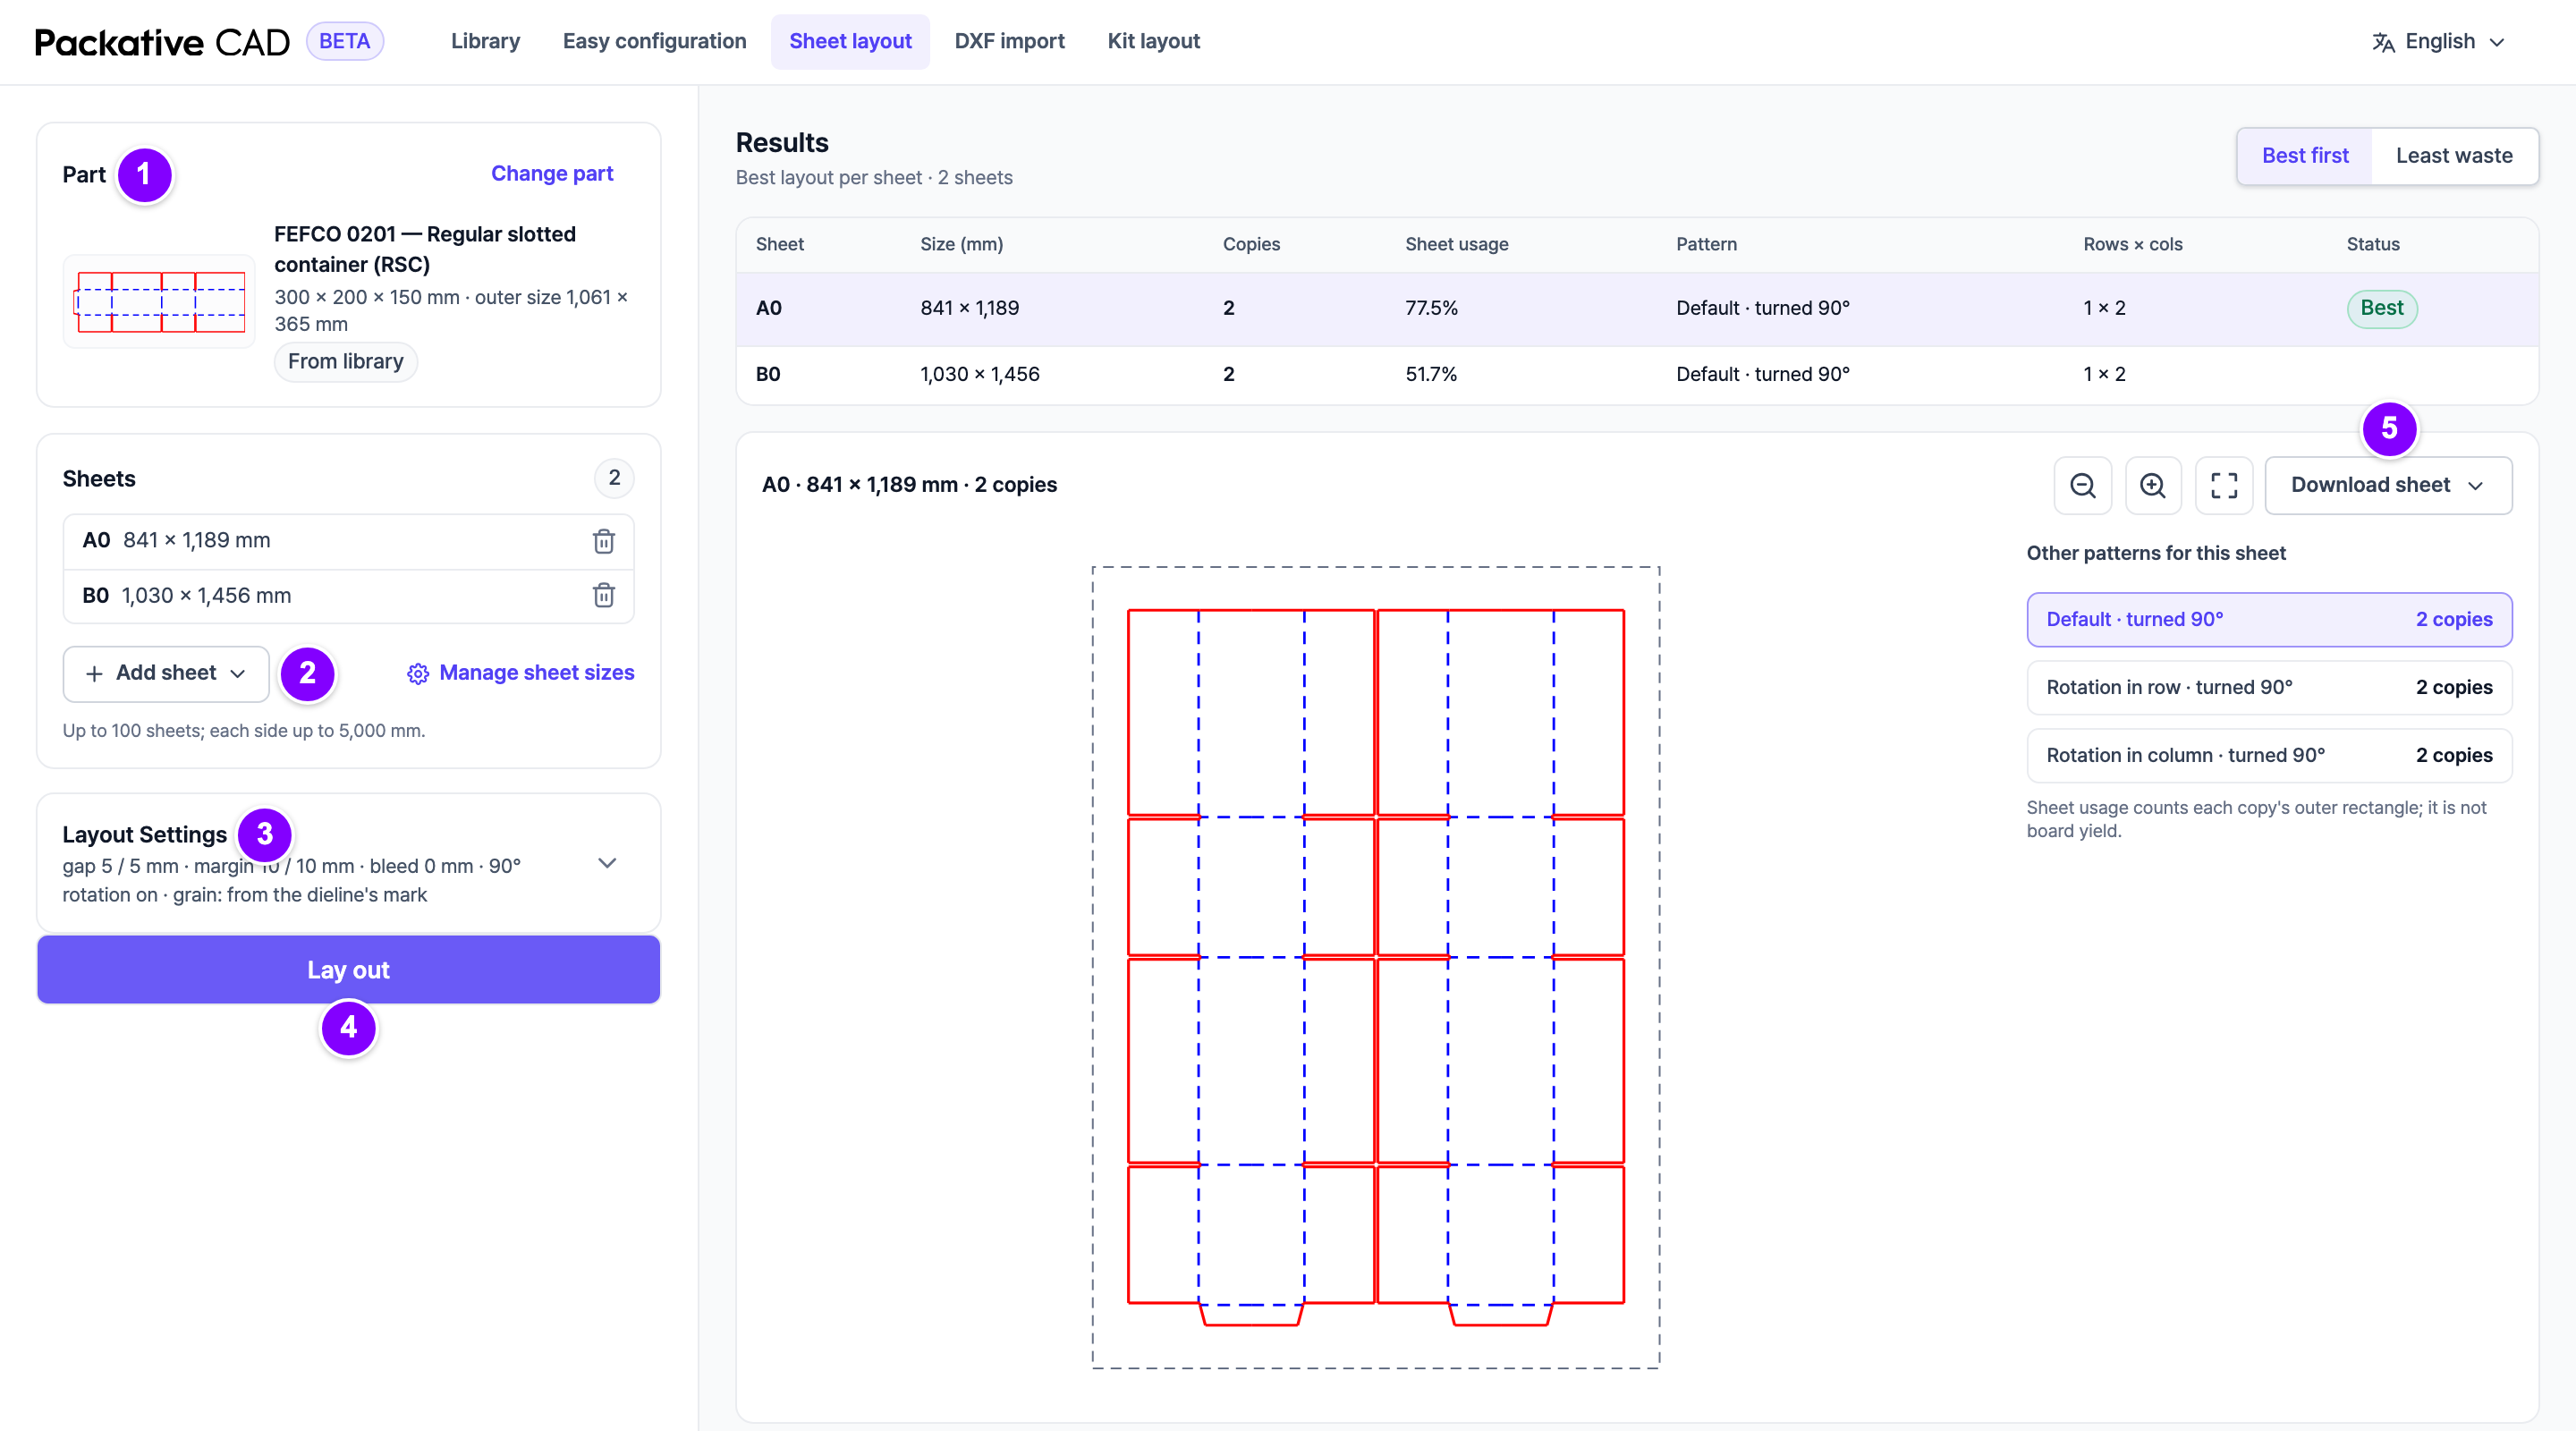
Sheet layout with the part and the sheet sizes on the left and the best layout on the right. The numbers match the steps below.
## Steps
1. 1 Open your dieline and select **Lay out on sheets**. The **Part** card shows it. With
no part yet, select **From library** or **From DXF**.
2. The **Sheets** list starts with the sheets of your last layout. 2 Select
**Add sheet** to pick more from your sheet sizes, or **Custom size** in the menu for a
one-off size. Remove a sheet with its bin icon. To choose which sheets the menu offers,
select **Manage sheet sizes** (see [Manage Your Sheet Sizes](https://cad.packative.one/help/guide/sheet-sizes/)).
3. 3 Open **Layout Settings** if you want to change the space between copies
(**Gap X (mm)**, **Gap Y (mm)**) or the free border (**Margin X (mm)**,
**Margin Y (mm)**).
4. 4 Select **Lay out**.
5. In **Results**, select a row to see that sheet's layout.
6. 5 Select **Download sheet** and a format: **DXF**, **PDF**, **SVG** or **PNG**.
## Reading the Results
| Column | Meaning |
|---|---|
| **Copies** (or **Boxes per sheet**) | How many fit on the sheet. |
| **Sheet usage** | How much of the sheet the boxes cover. It is not the board yield. |
| **Pattern** | How copies sit: all the same way, or every second one turned to interlock. |
| **Status** | **Best**, or a note such as **Not finished in time**. |
**Other patterns for this sheet** shows the other options and their counts.
## Good to Know
- You can enter up to 100 sheets, each side up to 5000 mm.
- In the sheet sizes and the layout settings, ++enter++ moves to the next number and
++shift+enter++ goes back.
- Sheet layout and [Print Several Parts Together](https://cad.packative.one/help/guide/kit-layout/) share the same sheets
and settings.
- **Grain on the sheet** is the direction the grain or flutes run on your board. If
your dieline has a grain mark, the app follows it.
- A dieline with several pieces is laid out as full boxes, so the results count
**Boxes per sheet**.
- Each **Lay out** and each download uses credits. Looking at results is free. See
[Sign In and Credits](https://cad.packative.one/help/guide/account/).
!!! tip
Changed the sheets or settings? The results say so. Select **Lay out again**.
## If Something Goes Wrong
- **Not finished in time**: the search stopped after 30 seconds. A better layout may
exist. Try fewer sheets.
- **Show sheets where nothing fits (*n*)** lists the sheets with no copies and the
reason, for example "Part larger than sheet".
---
# Manage Your Sheet Sizes
**Sheet sizes** is your list of press sheets. The **Add sheet** menu in
[Fit Boxes on a Sheet](https://cad.packative.one/help/guide/sheet-layout/) and [Print Several Parts Together](https://cad.packative.one/help/guide/kit-layout/)
offers the sheets you keep here, so you pick a sheet instead of typing its size each time.
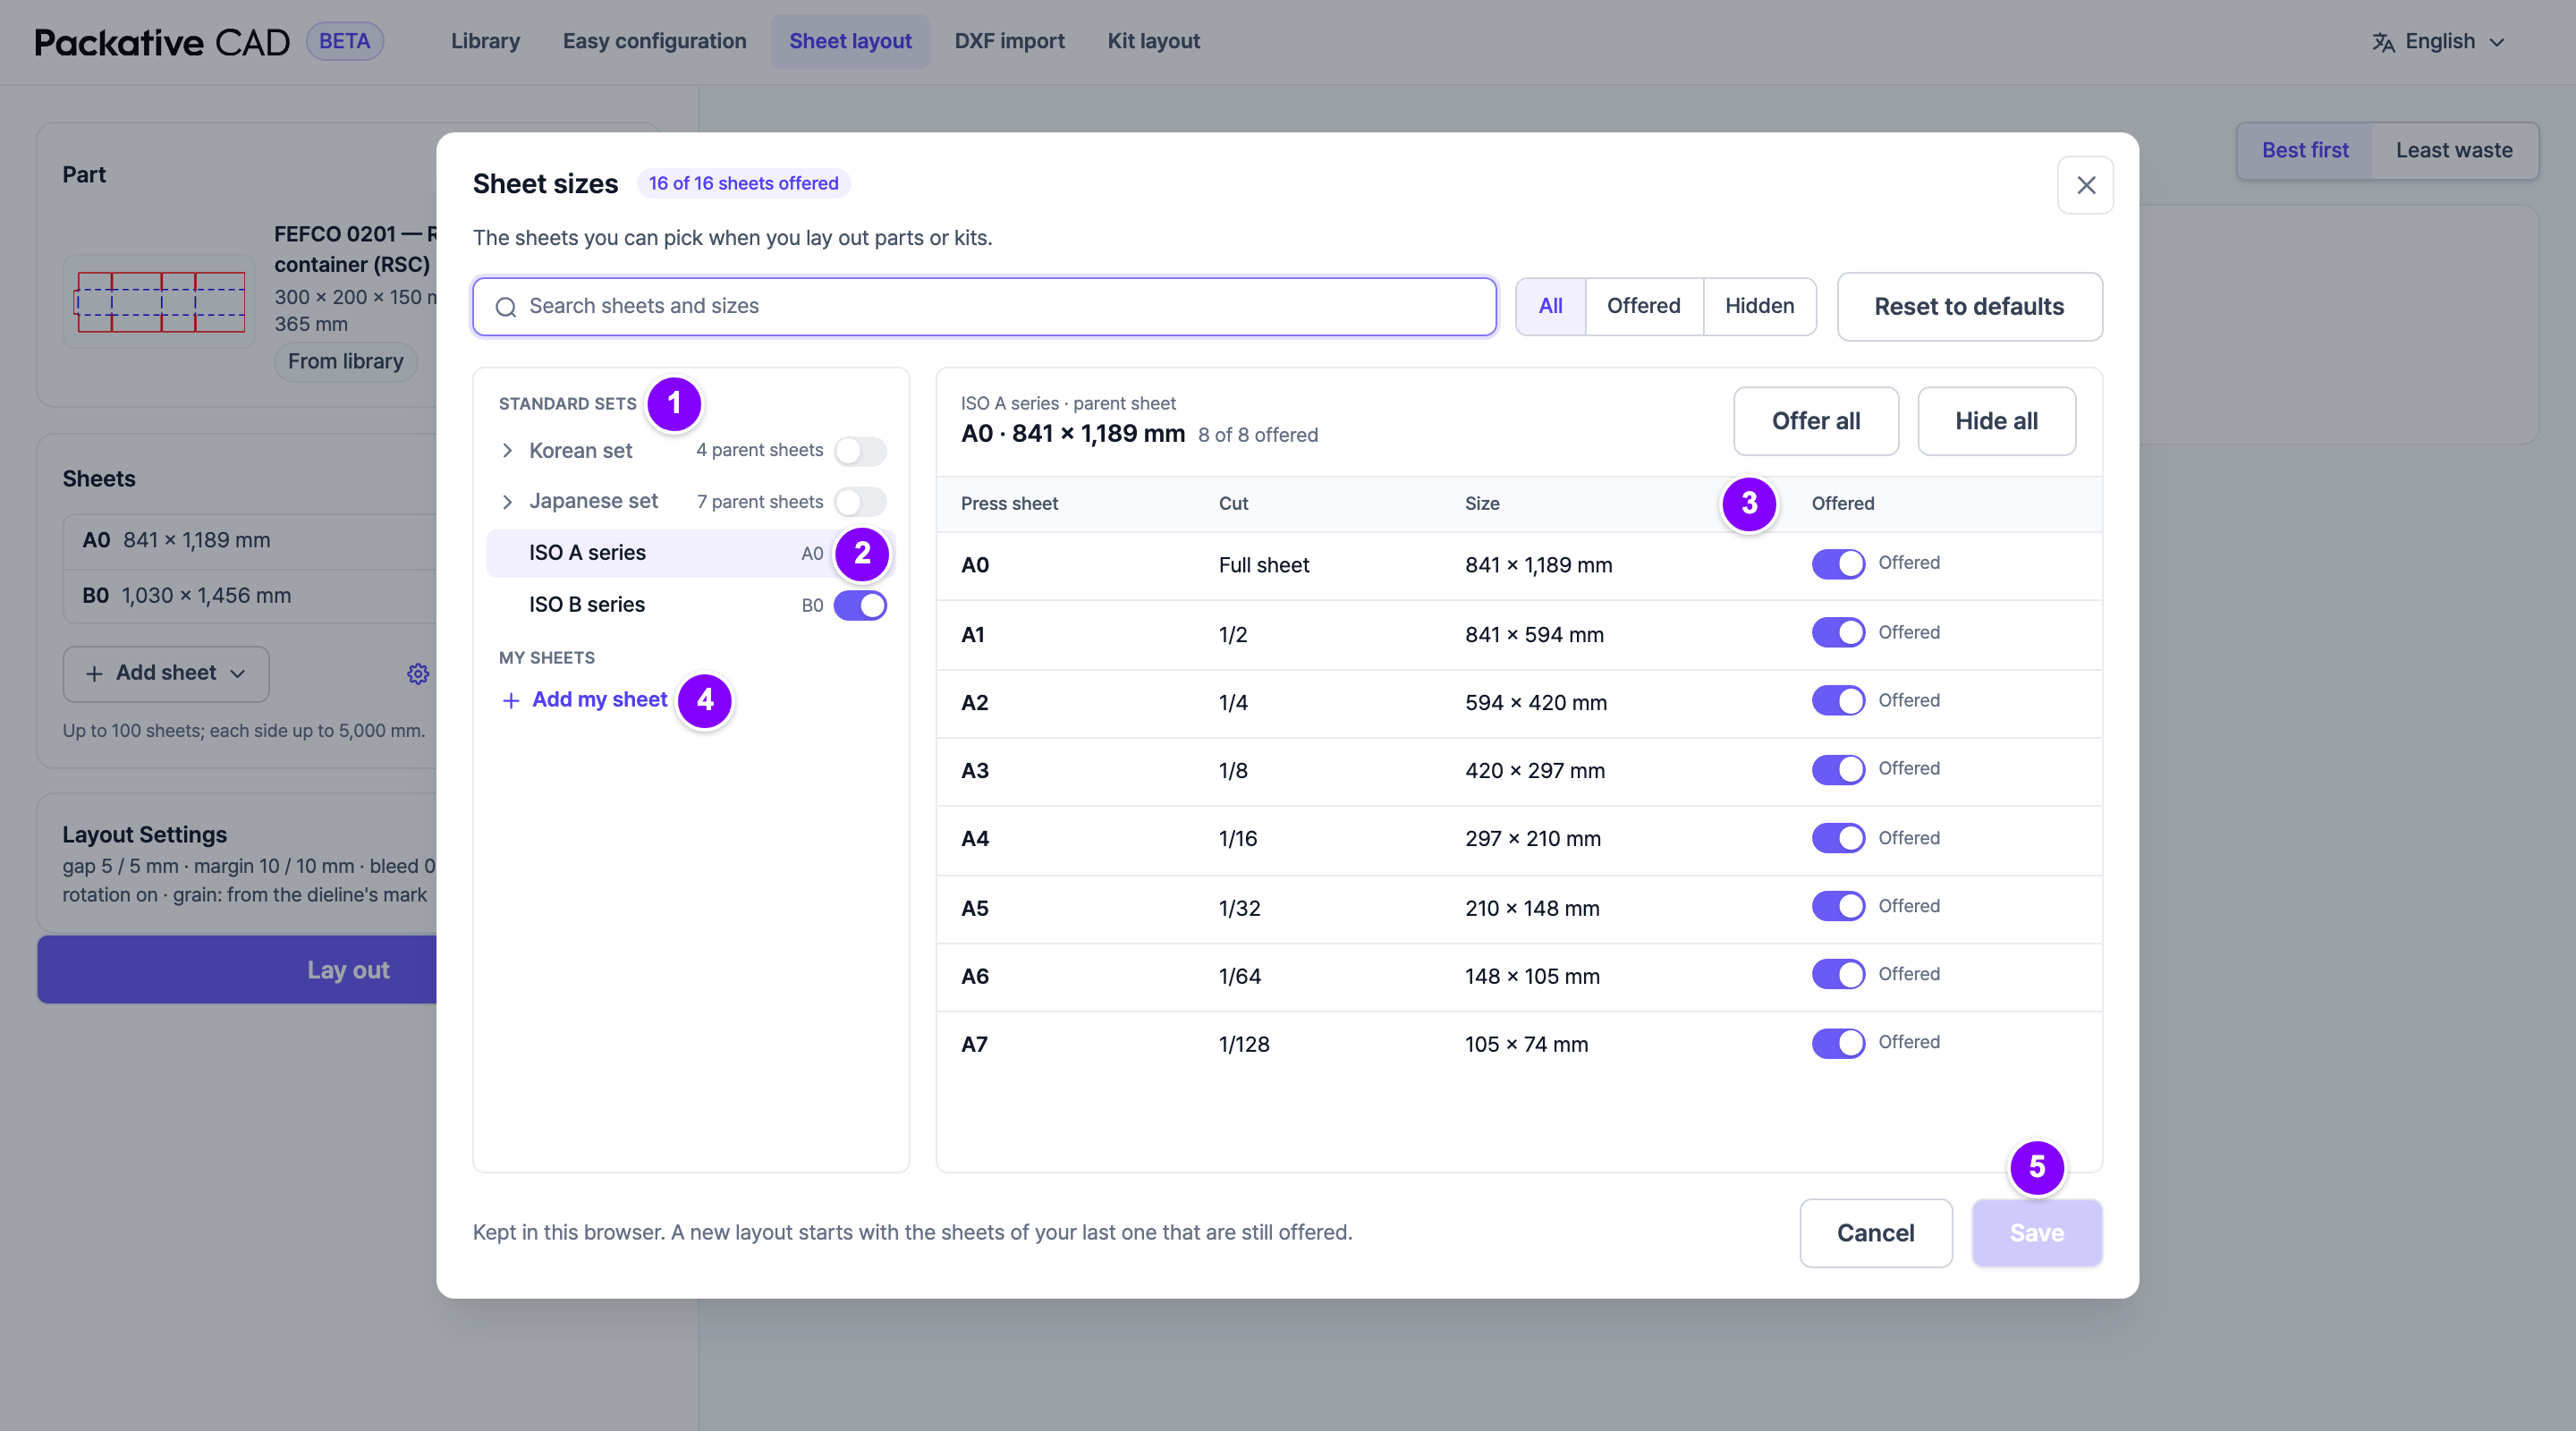
Sheet sizes with the sets and parent sheets on the left and the cuts of the selected parent sheet on the right. The numbers match the steps below.
## Steps
1. On the **Sheet layout** or **Kit layout** screen, select **Manage sheet sizes** under
the **Sheets** list.
2. 1 Under **Standard sets**, turn on each set you use: **Korean set**,
**Japanese set**, **ISO A series** or **ISO B series**. A set that is off offers no sheets.
3. 2 Select a parent sheet. On the right you see its cuts: the
**Full sheet** and its parts, each with its **Size**.
4. 3 Under **Offered**, turn off the sheets you never print on. **Offer all**
and **Hide all** change every cut of the parent sheet at once.
5. 4 To add a sheet of your own, select **Add my sheet**. Type a **Code**,
a **Name (optional)** if you like, the **Width (mm)** and the **Height (mm)**, and select **Add**.
6. 5 Select **Save**. The **Add sheet** menu uses your sheets at once.
## Pick Sheets for a Layout
- Select **Add sheet** under **Sheets**. The menu lists the sheets you offer; a tick shows
the ones already in this layout. Select a sheet to add it, or select it again to take it
out. **Select all** and **Clear all** do the whole list.
- Type in the search box to find a sheet by its name or size.
- **Custom size** at the bottom of the menu adds a sheet of any size for this layout only.
It shows **Custom**; the save icon next to it (**Save to my sheets**) keeps the size as
one of your own parent sheets.
## Your Own Parent Sheets
- The app makes the cuts for you: halves, quarters, eighths and sixteenths, each cut
halving the longer side.
- Each code must be new. If a cut of your sheet would have the code of another sheet, the
app says which one.
- Your own sheets are listed under **My sheets**. Use the pencil icon to change one, or
the bin icon to delete it. Layouts that already use its sheets keep them.
## Good to Know
- The first time, the sets follow your language: **Korean set** in Korean,
**Japanese set** in Japanese, and **ISO A series** and **ISO B series** in every
language.
- A new layout starts with the sheets of your last layout that you still offer. With
none, it starts with up to four full sheets of the sets that are on.
- A sheet in a layout that you no longer offer shows **Not offered in your sheet sizes**.
Select **Offer again** to offer it again.
- **Show** filters the list: **All**, **Offered** or **Hidden**.
- **Reset to defaults** sets the sets, offered sheets and start sheets back to the defaults
for your language. **My sheets** stay.
- Your sheet sizes are kept in this browser. In another browser or on another computer,
you start with the defaults.
---
# Print Several Parts Together
A **kit** is a set of different parts that belong together, such as a lid and a base, or
a box and two inserts. **Kit layout** shows how many complete kits fit on each of your
sheet sizes.
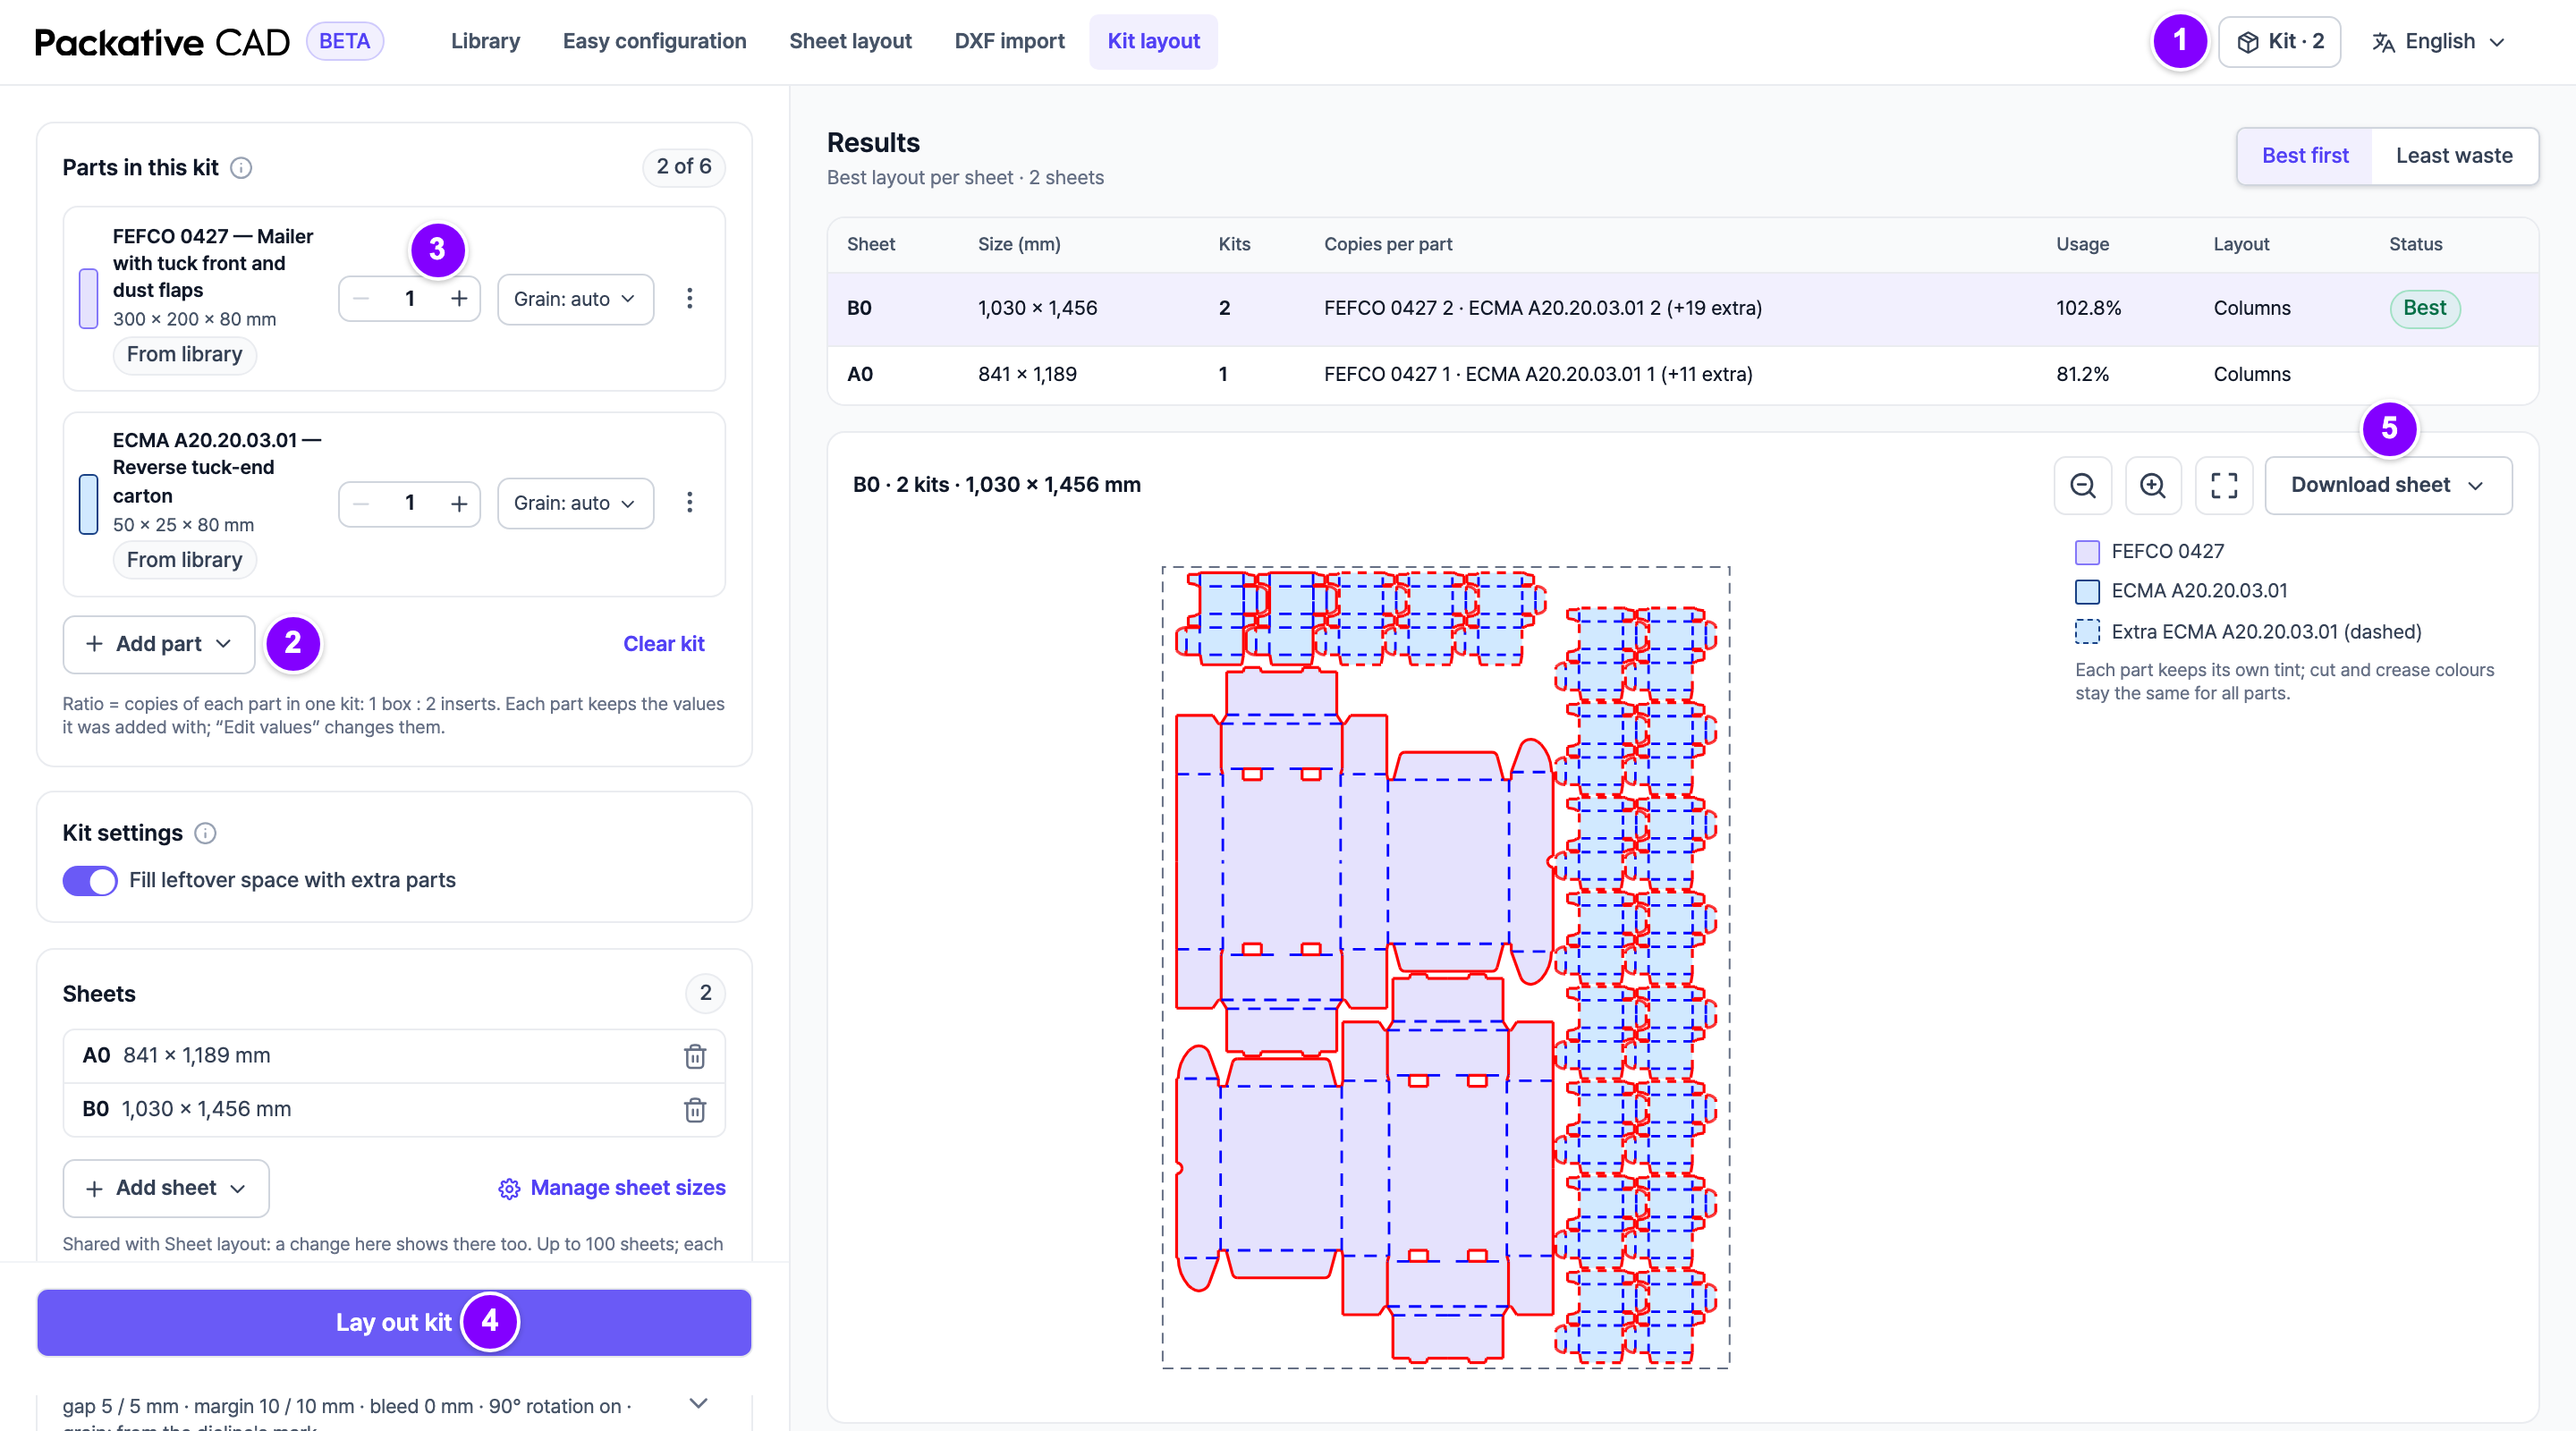
Kit layout with the parts list on the left and one sheet drawn with each part in its own colour. The numbers match the steps below.
## Steps
1. Open a dieline and select **Add to kit** in the bar above the dieline. You can also select
**Add to kit…** on a library card.
2. 1 Select **Kit · *n*** at the top right to open Kit layout.
3. 2 Select **Add part** to add more: **From the library…**, **From a DXF file…** or
**Current dieline**.
4. 3 In **Parts in this kit**, set the ratio of each part with **-** and **+**. For "1 box : 2 inserts", set
the box to 1 and the insert to 2.
5. Check the **Sheets** list, then 4 select **Lay out kit**.
6. Select a sheet in the results to see it. 5 Then select **Download sheet** to download it
as **DXF**, **PDF**, **SVG** or **PNG**.
## Reading the Results
| Column | Meaning |
|---|---|
| **Kits** | Complete kits per sheet. |
| **Copies per part** | How many of each part are on the sheet. |
| **Usage** | How much of the sheet the parts cover. |
| **Status** | A note when the sheet is simplified or not finished in time. |
## Good to Know
- A kit holds up to 6 parts, all on one board.
- The kit stays in your browser, even after a reload.
- Kit layout uses the same sheets and settings as
[Fit Boxes on a Sheet](https://cad.packative.one/help/guide/sheet-layout/). **Add sheet** offers the sheets of
[Manage Your Sheet Sizes](https://cad.packative.one/help/guide/sheet-sizes/).
- **Fill leftover space with extra parts** in **Kit settings** adds extra copies in free
space. They show as "+*n* extra" and do not count as kits.
- Each **Lay out kit** and each download uses credits. See
[Sign In and Credits](https://cad.packative.one/help/guide/account/).
## If Something Goes Wrong
- "No complete kit fits on these sheets": add a larger sheet, lower a ratio or remove a
part.
- **Simplified layout**: the search hit its limit, so more kits may fit. Use fewer parts
or lower ratios.
- **Not finished in time**: the search stopped after 30 seconds. Try fewer sheets.
---
# Use Your Own Dieline File
You can open a dieline drawn in another CAD program, as a DXF file. Then you can fold it
in 3D, fit it on sheets, add it to a kit or download it in another format.
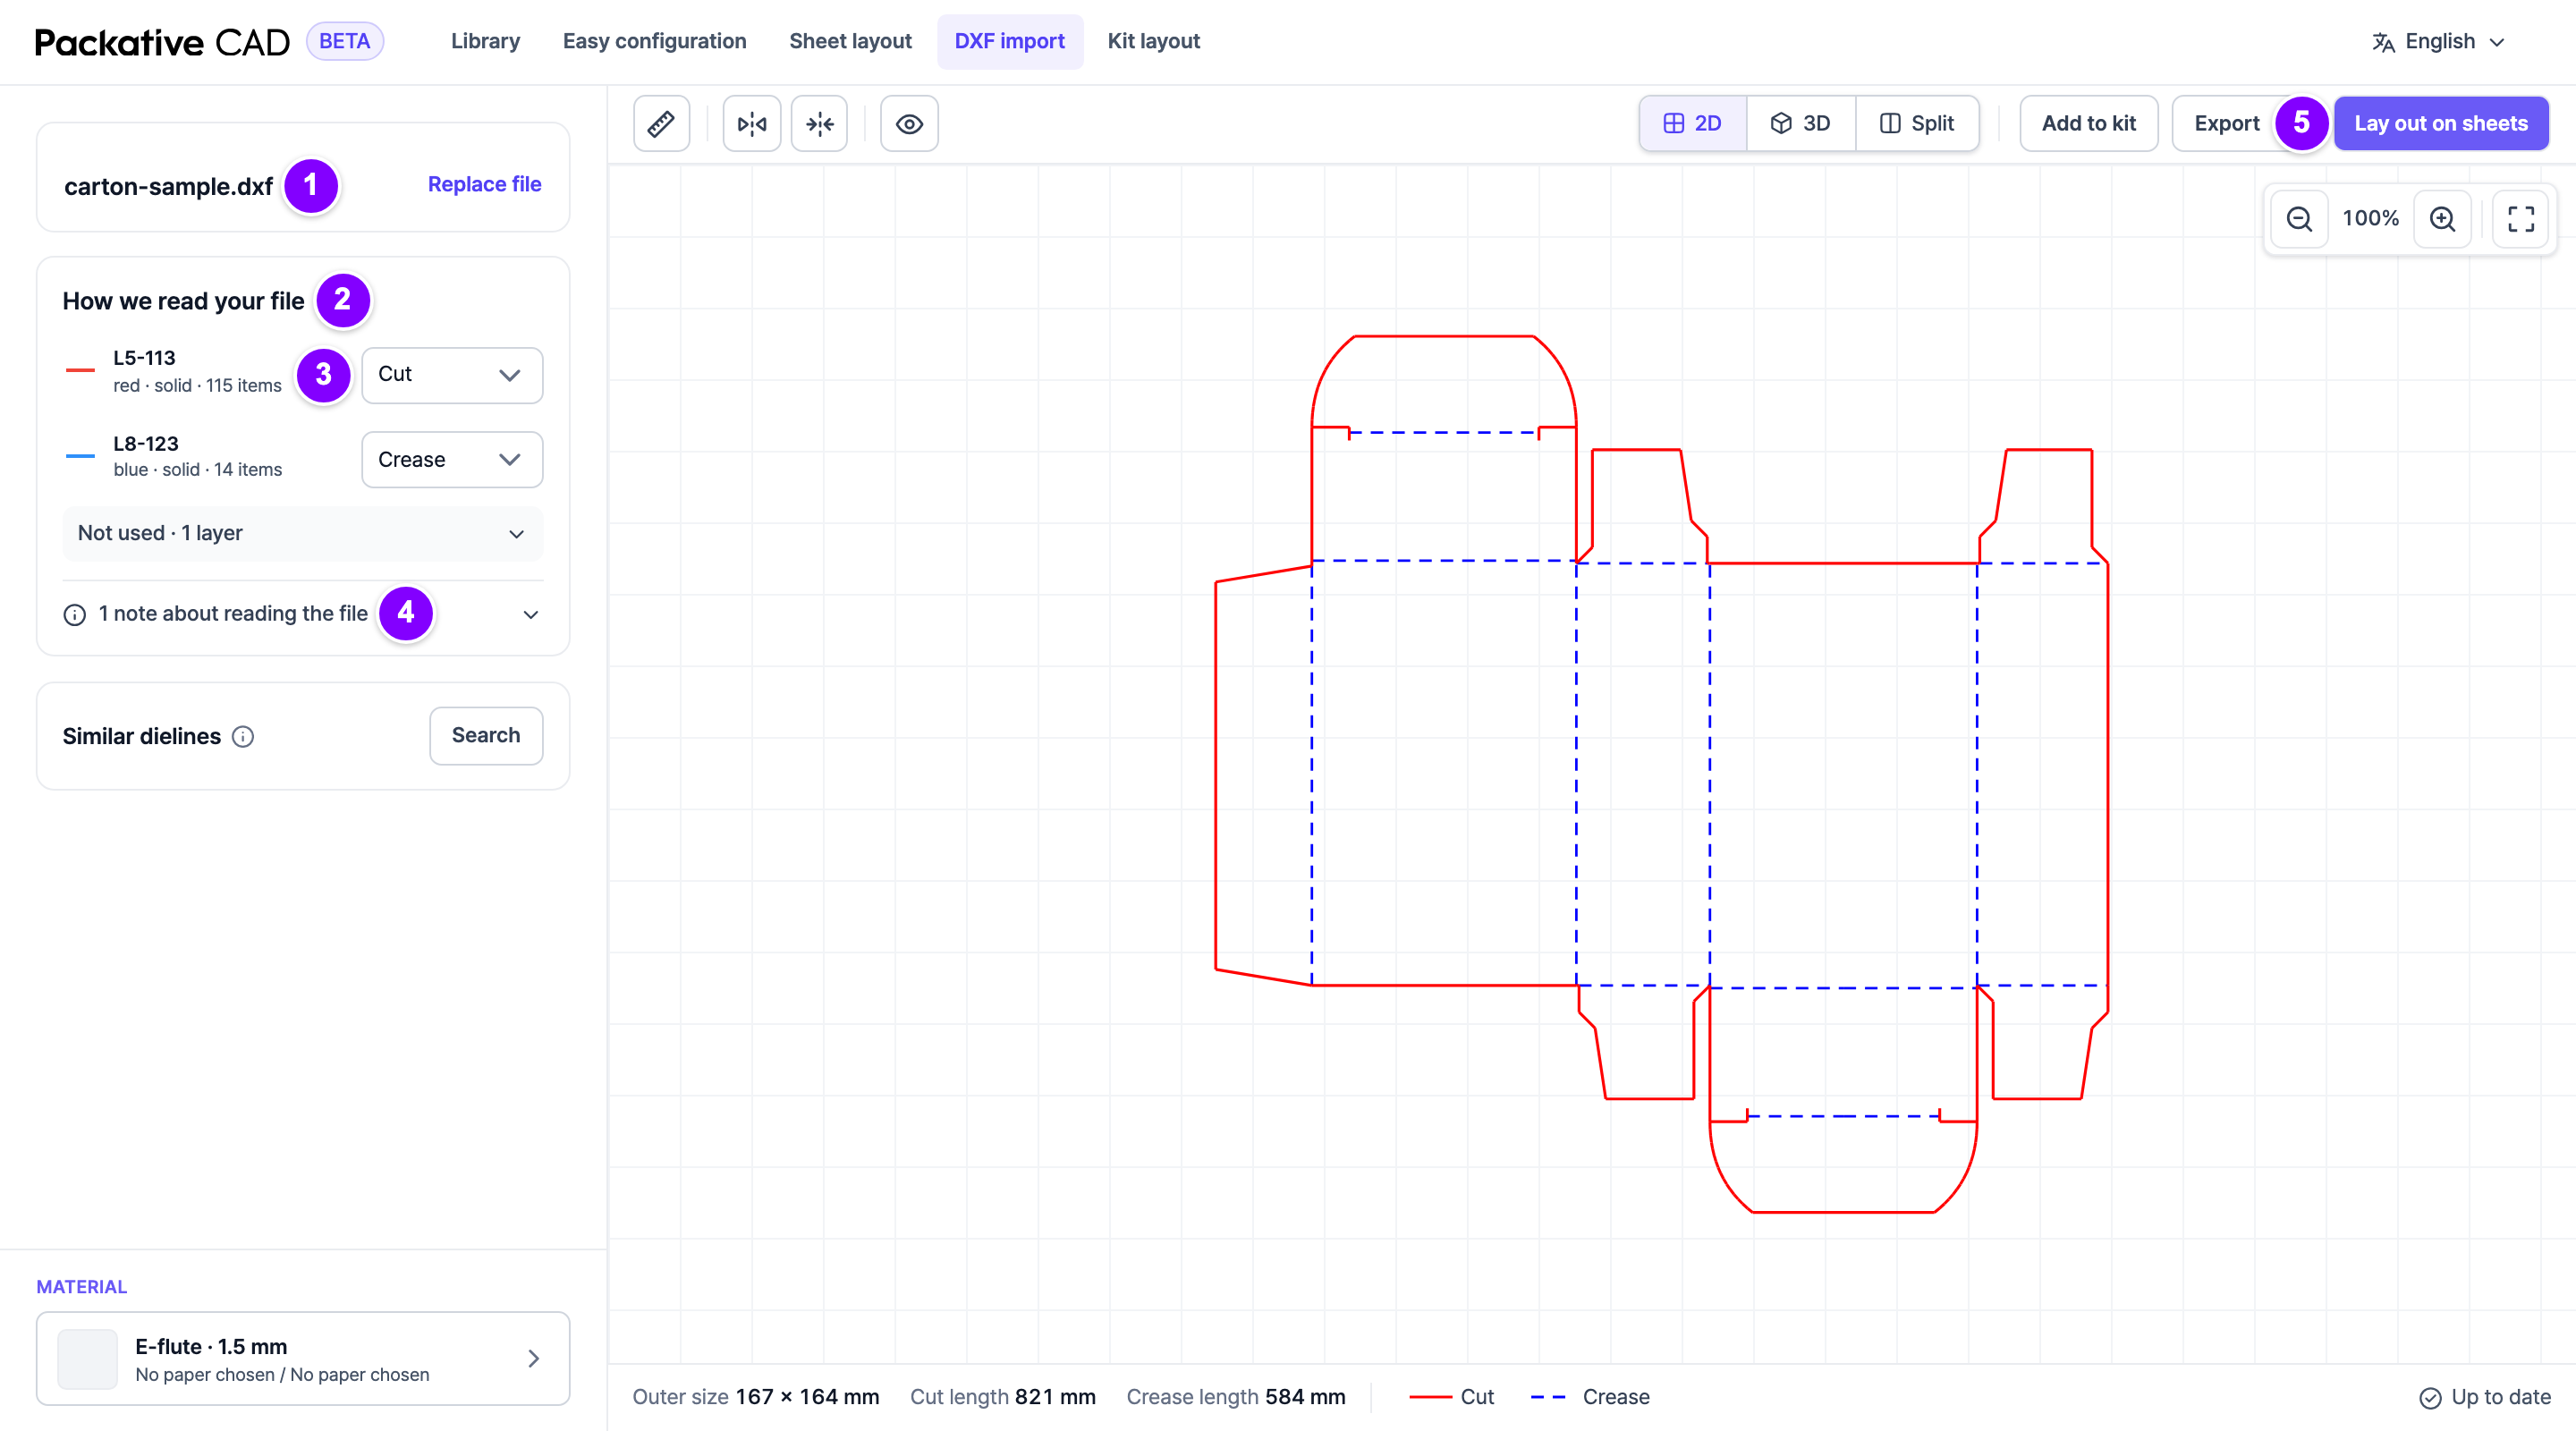
DXF import with the file card, the list of how each line was read, and the drawing. The numbers match the steps below.
## Steps
1. 1 Open **DXF import** and select **Choose a DXF file**, or drop the file on the screen.
The file card shows the file name. **Replace file** opens another file.
2. If the app had to guess the units, the file card says so. Then check that the size
is right.
3. Read any problems under the file card, such as "No cut lines were found."
4. 2 Look at **How we read your file**. It lists each group of lines and what the app read
it as: cut or crease (a fold line). Groups the app does not use are under
**Not used**.
5. 3 If a group is wrong, change the choice next to it, for example from **Crease** to
**Cut**. **Reset** undoes your change.
6. 4 Open the notes at the bottom of the card, for example **1 note about reading the file**.
They say what the app changed, such as "The drawing frame was left out."
7. 5 Use the drawing: **3D**, **Lay out on sheets**, **Add to kit** or **Export**.
## Your File Is OK When
- Cut lines are red and fold lines are blue.
- The **Outer size** at the bottom matches your drawing.
- No warning note shows.
## Good to Know
- The app does not store your file. It reads it only while it works on your request.
- The file can be up to 3 MB.
- **What was left out** shows the parts the app did not use, such as a drawing frame or
notes.
- If the file has several separate pieces, the **Pieces** card lists them. You can give a
piece another board.
- A drawing with no fold lines cannot be shown in 3D.
- **Download the original file** gives you the file back unchanged.
- Reading a file uses credits. See [Sign In and Credits](https://cad.packative.one/help/guide/account/).
!!! tip "For a clean import"
- Put cuts and creases on separate layers, named for what they are (for example
`CUT` and `CREASE`).
- Draw in millimetres.
- Remove title blocks and frames before you save the file.
- Close the cut outline.
## If Something Goes Wrong
| Message | What to do |
|---|---|
| "No cut lines were found." | Check that the cut outline is in the file. |
| "The drawing is very small" or "very large" | The units may be wrong. Check them in your CAD program. |
| "Export it again as DXF (R2010 or later) and upload it." | Save the file again as a newer DXF version. Your CAD program offers it when you save as DXF. |
| "This drawing has too many details to lay out." | Simplify the drawing and try again. |
---
# Quick Box Setup
**Easy configuration** lets you set up a box by selecting pictures. You select a box,
type its size, and select each closure from a row of picture cards.
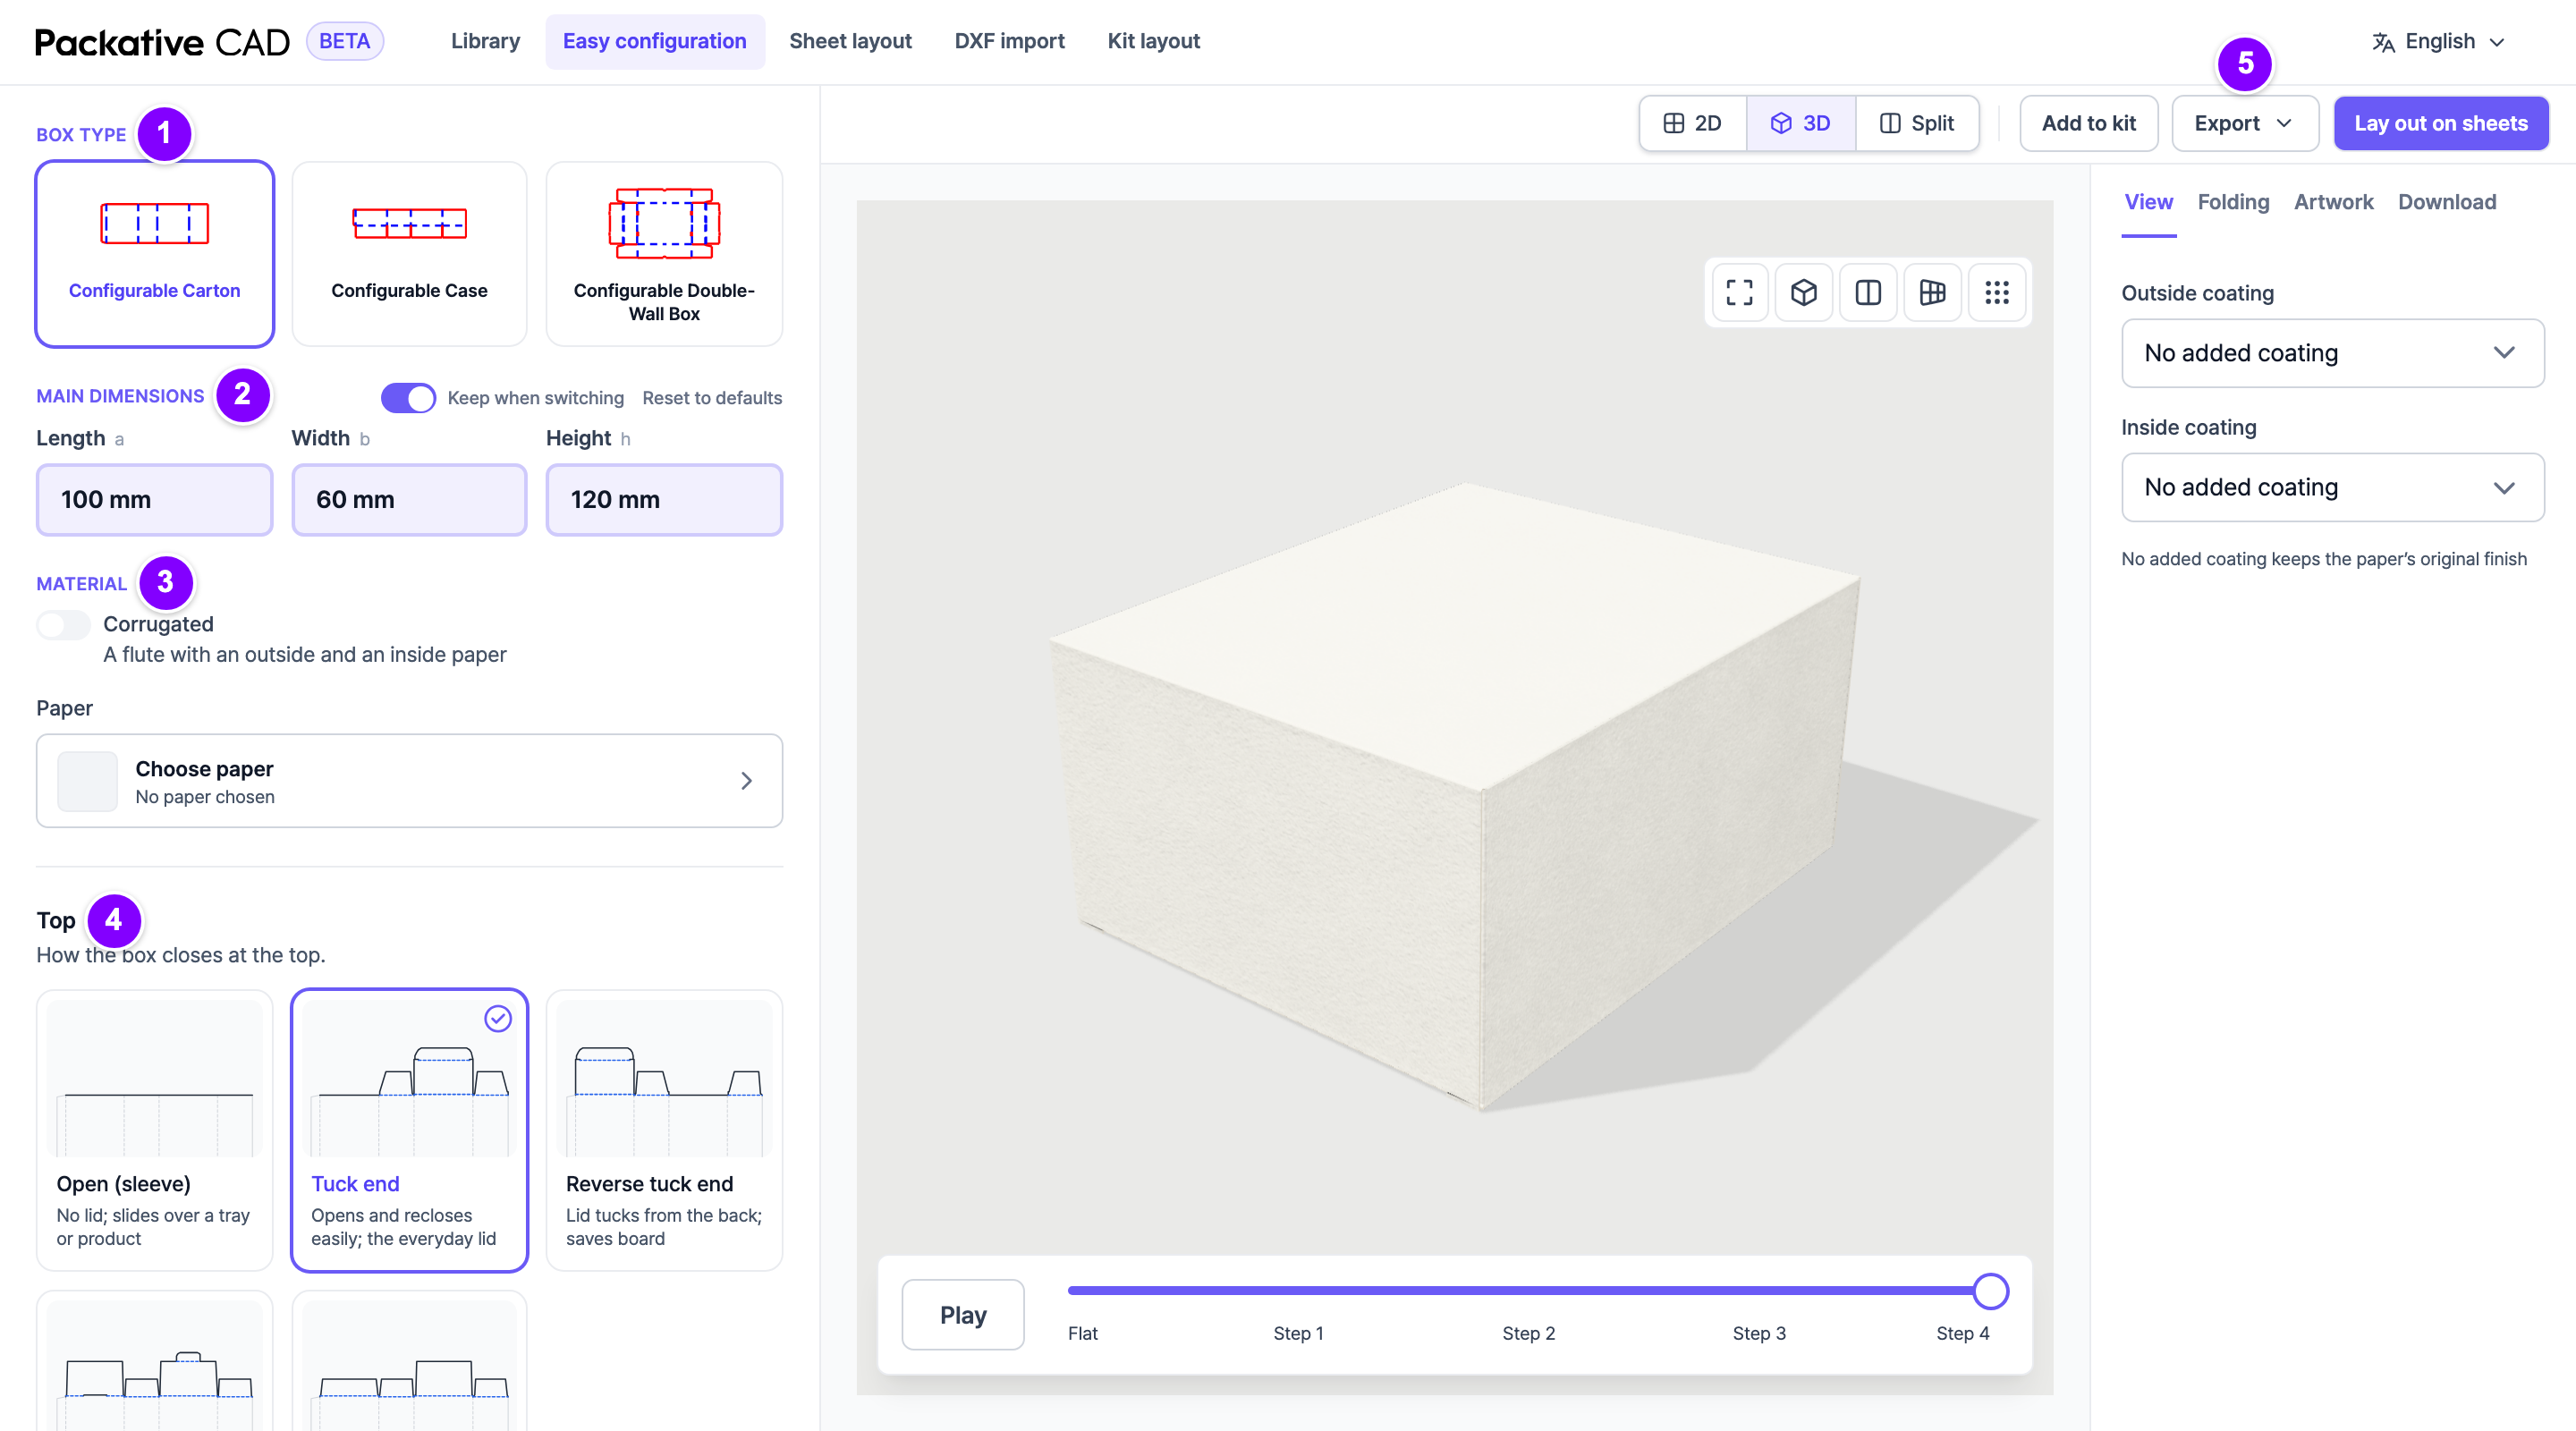
Easy configuration with the side panel of choices next to the box. The numbers match the steps below.
## Steps
1. 1 Under **Box type**, select one of the three boxes.
2. 2 Under **Main dimensions**, type the **Length**, **Width** and **Height**.
3. 3 Under **Material**, select the board or paper.
4. 4 In each group of picture cards, for example **Top**, select the option you want. The drawing updates.
5. 5 Select **Export** at the top right to download the dieline, or **Lay out on sheets** to fit it on a
sheet.
## The Three Boxes
Configurable Carton: a carton with many top and bottom styles
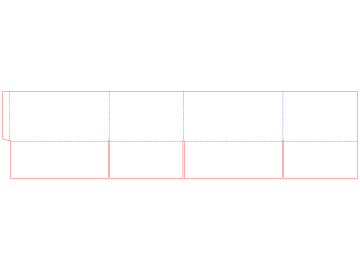
Configurable Case: a corrugated shipping box
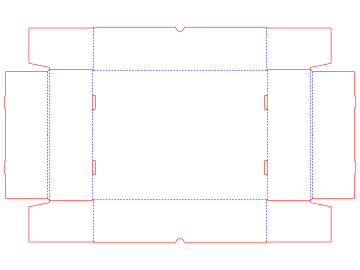
Configurable Double-Wall Box: trays and mailers with double walls
## Good to Know
- A group of cards shows only when it changes the drawing.
- **Reset to defaults** brings back the box's start values.
- If you switch the box type, your length, width and height stay.
- ++enter++ moves from **Length** to **Width** to **Height**; ++shift+enter++ goes back.
- The same three boxes are in the [library](https://cad.packative.one/help/guide/library/), where you see every setting.
---
# Sign In and Credits
Packative CAD is a free public beta. You sign in with Google and get free **credits**
each month. Browsing the library is free. Drawing, 3D, layouts and downloads use credits.
## Sign In
1. Select **Continue with Google**.
2. Select your Google account in Google's window.
3. You come back to the page you started from.
Your account is made the first time you sign in. There is no separate password.
## What Uses Credits
| Action | Credits |
|---|---|
| Browse and search the library | free |
| Draw a dieline in a new size | 1 |
| Download a 3D picture (**Download PNG**) | 1 |
| Fold in 3D | 3 |
| Fit boxes on a sheet (each **Lay out**) | 5 |
| Read a DXF file | 5 |
| Print several parts together (each **Lay out kit**) | 10 |
| Download a file, also a 3D model (GLB, USDZ or HTML) | 10 |
A size or 3D fold you already made this month is free again. If something fails on our
side, you get the credits back.
## See Your Credits
Select your name at the right of the app bar. The menu shows how many credits you used
this month and when they renew. A dot on your picture turns amber at 80 % and red when
the credits are used up.
## Limits
- You get 200 credits per month. They renew at the start of each month.
- People on one company network share a daily limit. If many colleagues use the app,
[contact us via packative.one](https://packative.one/contact) and the limit can be raised.
## When Your Credits Run Out
The app shows "You've used this month's free credits" and the date your credits renew.
- You can still browse the library for free.
- Wait until the renewal date, or get more free credits (see below).
- Need more? [Contact us via packative.one](https://packative.one/contact).
## Get More Free Credits
Select **Get more free credits** in your account menu. There are two ways:
| Way | What you get |
|---|---|
| Fill in the short feedback form (about two minutes) | 100 credits, once |
| **Invite a friend** by email or with **Copy link** | 100 more credits every month, up to 1,200 a month. Your friend also gets 100 credits. |
An invite counts when your friend signs in for the first time.
## If Something Goes Wrong
| Message | What to do |
|---|---|
| "Sign-in was cancelled." | Select **Continue with Google** again. |
| "Your session has ended." | Sign in again. |
| "This Google account can't use Packative CAD" | Select **Use another Google account**. |
| "Your account is paused" | Select **Ask for a review** if this is a mistake. |
!!! note "Your files"
The app does not keep your drawings or DXF files. Artwork you place in 3D stays in
your browser.
---
# Use Packative CAD in Claude or ChatGPT
With the **Packative CAD connector** you can work from a chat in Claude or ChatGPT. Ask
for a box style and size, and the assistant finds the dieline, draws it and gives you
download links. It can also fit boxes on a sheet, plan a kit, fold the box in 3D, put
your artwork on it and find dielines like a DXF file you have.
The assistant signs in as you and uses your own credits. Nothing extra is installed on
your computer.
!!! note "Preview"
The connector is in preview. If adding it fails, it is not open for your account
yet. [Contact us via packative.one](https://packative.one/contact).
## The Connector Address
You need this address in both apps:
```
https://cad-api.packative.one/mcp
```
## Add It to Claude
Claude has custom connectors on the Free, Pro, Max, Team and Enterprise plans. On the
Free plan you can add one custom connector.
**Pro, Max and Free**
1. In Claude, open **Customize** > **Connectors**.
2. Select **+** and then **Add custom connector**.
3. Enter the name `Packative CAD` and the connector address above. Leave
**Advanced settings** empty.
4. Select **Add**, then **Connect** next to Packative CAD.
5. A Packative CAD page opens. Sign in with Google if asked.
6. Check the page: it names the app and where its access goes (`claude.ai`). Select
**Allow**.
7. You come back to Claude. The connector is ready.
**Team and Enterprise**
An owner adds the connector once for the organization: **Organization settings** >
**Connectors** > **Add** > **Custom** > **Web**, with the name and address above. Each
member then connects from **Customize** > **Connectors** and follows steps 4 to 7.
In a chat, turn the connector on from the **+** menu under **Connectors** if Claude does
not use it on its own.
## Add It to ChatGPT
Custom connectors need a paid ChatGPT plan (Plus, Pro, Business, Enterprise or Edu) and
**Developer mode**, on chatgpt.com in a browser. On Business and Enterprise, an admin may
have to allow it.
1. Open **Settings** > **Apps & Connectors** (on some accounts **Connectors**).
2. Under **Advanced settings**, turn on **Developer mode**.
3. Back on the connectors page, select **Create**.
4. Enter the name `Packative CAD`, the connector address above as the
**MCP server URL**, and choose **OAuth** for **Authentication**.
5. Confirm that you trust this connector, then select **Create**.
6. A Packative CAD page opens. Sign in with Google if asked, check that access goes to
`chatgpt.com`, and select **Allow**.
7. In a new chat, select **+** > **Developer mode** and turn on Packative CAD.
Menu names in Claude and ChatGPT change from time to time. If you cannot find a step,
look for "connectors" or "apps" in the app's settings.
## What You Can Ask
- "Find a mailer box for books and draw it 320 × 240 × 60 mm in E-flute."
- "Download that dieline as a PDF for my printer."
- "How many fit on a 1600 × 1200 mm sheet?"
- "Make a kit: one lid and one base, and two inserts for each box."
- "Show me the box in 3D as an HTML file I can send to my customer."
- "I have a DXF of an old box. Which dielines in the library are like it?"
The assistant gives you download links. A link works for about an hour; ask again for a
fresh link to the same file, which is free. Files are kept for 7 days.
## Put Your Artwork on the Box
1. Ask the assistant for the dieline as an **AI** or **PDF** file, with the main
dimensions only.
2. Put your artwork on the **ARTWORK** layer in your design program. Keep the
**DIELINE** and **DIMENSIONS** layers as they are. Save as PDF, or as AI with
**Create PDF Compatible File** on.
3. Ask the assistant to put the artwork on the box. It gives you an upload link.
4. Open the link, choose your file (up to 50 MB) and select **Upload**.
5. Go back to the chat and say the file is uploaded. A few seconds later you get the 3D
box with your print, as an HTML page and a GLB model.
Only a file downloaded for the same dieline and size fits. Your file is deleted after 24
hours.
## Find Dielines Like Your DXF
Ask the assistant to find dielines like your DXF file. It gives you an upload link for
the `.dxf` file. After you upload it, the assistant lists the library dielines built the
same way, best match first, and can draw any of them in your size.
## Credits
The assistant uses the same monthly credits as the app, at the same prices (see
[Sign In and Credits](https://cad.packative.one/help/guide/account/)). Some actions exist only in the assistant:
| Action | Credits |
|---|---|
| 3D model as an HTML page or GLB | 3 |
| Put your artwork on the 3D box (per uploaded file) | 5 |
| Find dielines like a DXF file | 5 |
| A fresh link to a file you already have | free |
Asking for the same thing again in the same month is free. To protect the library, an
assistant can draw at most 20 new sizes of one dieline a month and has a limit per
minute. When credits run out, the assistant tells you how many are left and when they
renew.
## Disconnect
Select your name in the app bar, then **Connected apps**. You see each assistant you
connected, when it connected and when it was last used. Select **Disconnect** to remove
one; it loses access within the hour. A connection must be allowed again 90 days after
you made it.
## Your Data
The connector records each request the assistant makes (the action and its settings,
such as box style and size), linked to your account but without your name or email.
These records are used only to run the connector (credits, fair use, security, support) and
to see how it is used; they are never used to train AI models and are deleted after 12
months ([privacy policy](https://packative.one/legal/privacy)). Your chat itself stays in
Claude or ChatGPT, and uploaded files are never kept beyond 24 hours.
## Something Went Wrong
| What you see | What to do |
|---|---|
| Adding the connector fails | Check the address. The connector may not be open for your account yet: [contact us](https://packative.one/contact). |
| The Packative CAD page warns that the app is not verified | The app that asked for access is not Claude or ChatGPT. Select **Cancel** unless you added it yourself. |
| "This file doesn't match the dieline" | Download the AI or PDF again for the same dieline and size, with the main dimensions only. |
| The download link no longer opens | Ask the assistant for a fresh link to the same file. |
| The assistant says your credits are used up | Wait until they renew, or see [Get More Free Credits](https://cad.packative.one/help/guide/account/#get-more-free-credits). |
---
# Questions and Answers
## Using the App
### Does the app save my boxes?
No. The box style and its sizes live in the page address. Copy the address to keep or
share a box. The app stores only your account: your usage, your invites and your
feedback.
### Which languages does the app have?
English, Korean and Japanese. English is the default. Change the language in the bar at
the top.
### Which files can I download?
- A dieline: DXF, SVG, PDF, PNG, EPS or AI (Illustrator).
- A sheet or kit layout: DXF, SVG, PDF or PNG.
- A 3D box: GLB, USDZ, HTML or PNG.
See [Download Files for Print](https://cad.packative.one/help/guide/export/).
### Can I use my own dieline?
Yes, as a DXF file. See [Use Your Own Dieline File](https://cad.packative.one/help/guide/dxf-import/).
### What do credits pay for?
You get 200 credits a month. Browsing the library is free.
| Action | Credits |
|---|---|
| Browse and search the library | free |
| Draw a dieline in a new size | 1 |
| Download a 3D picture (**Download PNG**) | 1 |
| Fold in 3D | 3 |
| Fit boxes on a sheet (each **Lay out**) | 5 |
| Read a DXF file | 5 |
| Print several parts together (each **Lay out kit**) | 10 |
| Download a file, also a 3D model (GLB, USDZ or HTML) | 10 |
A size or 3D fold you already made this month is free again. See
[Sign In and Credits](https://cad.packative.one/help/guide/account/).
### What do I do when my credits run out?
You can still browse the library. Your credits renew at the start of each month. To get
more now, select **Get more free credits** in your account menu: fill in the short
feedback form, or **Invite a friend**. Need more than that?
[Contact us via packative.one](https://packative.one/contact). See
[Sign In and Credits](https://cad.packative.one/help/guide/account/).
## When Things Look Wrong
### I cannot find a box style I know.
Search by code, name or shape in [Find a Box Style](https://cad.packative.one/help/guide/library/). Small parts
such as locks and closures are not listed on their own. They appear inside the box
styles that use them.
### Some sheets say **Not finished in time**.
One layout can run for 30 seconds. Try fewer sheets or a simpler box. See
[Fit Boxes on a Sheet](https://cad.packative.one/help/guide/sheet-layout/).
### The layout does not turn my box.
The board grain allows only some turns. Set the grain options to auto to free the box.
See [Fit Boxes on a Sheet](https://cad.packative.one/help/guide/sheet-layout/).
### The box folds wrongly in 3D.
3D folding is in beta, and some box styles fold the wrong way. You can fix the angles in
the 3D view's **Folding** tab. See [See Your Box in 3D](https://cad.packative.one/help/guide/3d/).
### Can I use the app from a script or an AI agent?
No, not without a written agreement signed by Packative.
## What Are the Limits?
| What | Limit |
|---|---|
| Sheet side | 5000 mm |
| Sheets in one layout | 100 |
| Parts in a kit | 6 |
| Time for one layout | 30 seconds |
| DXF file you open | 3 MB |
| Credits per month | 200 |
!!! warning "Check before you make a die"
Not every dieline has been tested in production. Check the sizes and the file with
your die maker before a cutting tool is made.
!!! note "Illustrator files"
An AI (Illustrator) file cannot hold measurement labels in Korean or Japanese.